Tips for migrating local user profiles from Windows Terminal Server 2008r2 to 2016/2019


Microsoft stopped providing security updates for Windows 7 and Windows Server 2008r2. I was requested to migrate all local user profiles from 2 terminal servers in order to keep the maximum number of files and settings for each user. The users explicitly asked to keep the maximum amount of small settings in their applications. I did encounter a number of problems. The list of tips I provide here can be used as a source of inspiration for others with a similar migration task. There may be other, even better ways to resolve some problems; I am just describing how I did it.
We have one of the top antivirus systems installed (Bitdefender) but still, I was amazed at how many malware files I found in the source profiles. It would be a pity to transfer the malware together with the profiles, so I wanted to avoid that by removing them without a high cost.
Users do not have administrative privileges on the terminal server but still have enough privileges to write temporary files and install browser plug-ins, so apparently, the malware was still able to flow in undetected.
I tried using Malwarebytes version 4, but even though the version claimed to be free for a limited amount of time, I still had to purchase a license before I could actually remove the malware. So, I installed the latest Mbam version 3 (mb3-setup-consumer-3.8.3.2965); now I was able to freely remove the detected malware. I had to reboot and reran a scan to detect/remove a few more. I uninstalled the free test software after that.
In this step I wanted to avoid copying over big and useless files; still, I didn't want to spend too much time on it. I decided to avoid 2 types of files:
- Many applications create big dump files in the user folders each time they crash (with extension .dmp), I searched for them and deleted them.
- Many users leave huge WeTransfer files in their download folders; I searched for them and removed the very old ones. I did a search on gigantic file size and decided which files to keep and which not; sometimes a duplicate installer or a huge demo movie (by accident downloaded from the Internet) could be deleted. This is on the edge of being ethical, but when done with caution, nobody cares.
- There may be better ideas here with more results but I decided to leave it here, really quick.
3. Find the correct syntax to Robocopy a profile
I tried to use Robocopy to copy a profile from the old to the new terminal server. I found a lot of syntax examples, but when I tried them, I noticed that the copy kept going forever: it was recursively creating an ‘Application Data’ folder inside an ‘Application Data’ folder, in a seamlessly never-ending loop. These recursive folders were difficult to delete; the easiest method was using Robocopy again from an empty folder to the incorrectly filled destination.
Apparently, in this old 2008r2 server system, there is something called an NTFS “junction point” in the file system, and Robocopy follows that point over and over again causing this issue.
The solution is to use the /XJ switch with Robocopy to exclude NTFS junction points, in order to avoid that endless ‘Application Data’ folder nesting when copying from Windows 2008r2 server.
Example working syntax:
robocopy C:\Users\myusername\ \\newserver\c$\Users\myusername\ /MIR /copyall /xj /zb /w:1 /r:2 /XF *.tmp
4. Copy the user profiles
This is the most difficult step because it requires doublechecking to avoid making mistakes. Follow the following steps chronologically:
- Check that the user is not logged in on the source server to avoid that files are being in use.
- Check the exact folder name of the source profile, you will need the folder name for the Robocopy command. The folder name can be the same as the username, but it can also be the username + ‘.’ + domain name.
- If you are using access groups to give users access to the new server or to the Remote Desktop Gateway to the new server, add the user to that group.
- Log into the new server with the username so that the profile is created and correctly linked in the registry. Now logoff.
- Execute your Robocopy command (cfr. syntax in tip 3)
- Log in on the new server with the username so that the profile is updated.
5. Correct some problems inside the user profile:
- ( A ) Overwrite the permissions of all child objects of a user folder.
In some applications, the users received an error unable to write temporary files. It turned out that the files could not be written because the permissions on the folders were not always correct. Strange that Robocopy was not able to copy all permissions exactly as they were. Robocopy does not care a lot about permissions and does not even compare them.
I was able to fix this by giving the user access again to all child objects inside its own profile folder. Select the profile folder, select the Security tab, click on advanced, check the checkbox to replace all child objects and click ok.

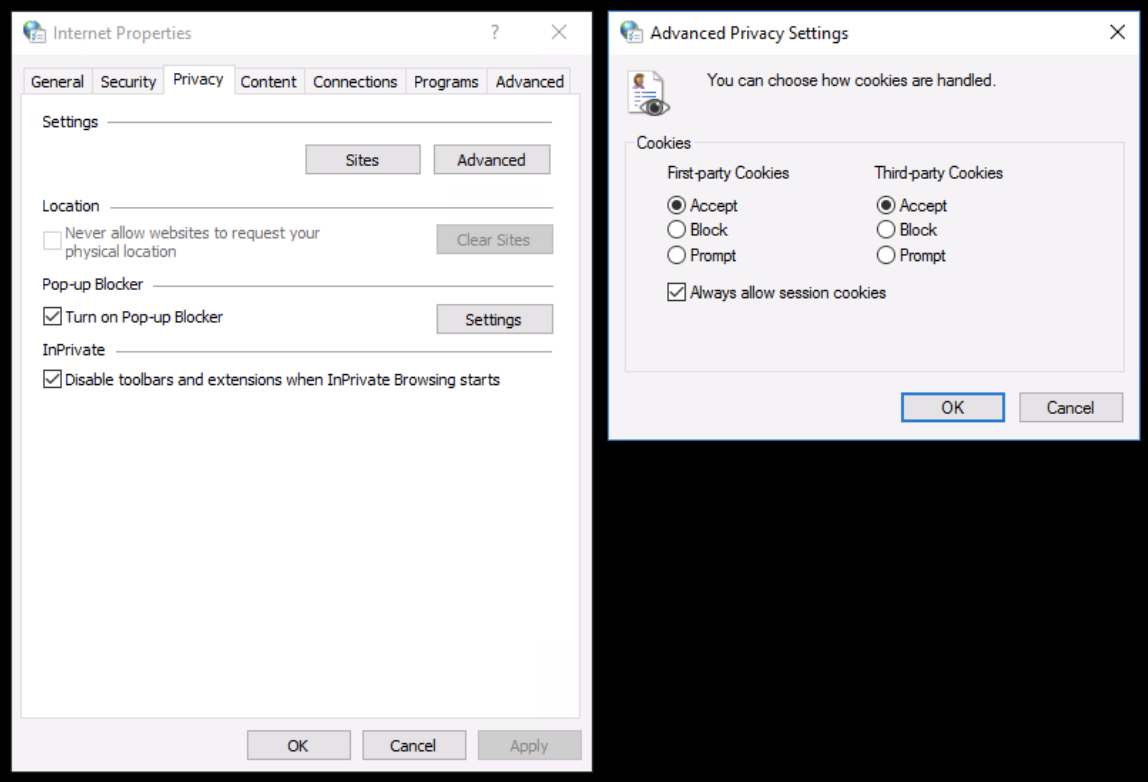
- ( B ) Unable to activate Office 365, because cookies are blocked.
The next problem I bumped into was that users are unable to activate their Office 365 account. When trying to activate Office, it prompts me to sign in, and as soon as I enter an email address, it says: “Cookies must be allowed. Your browser is currently set to block cookies. Your browser must allow cookies before you can use a Microsoft account.”
This is how to fix this silly Microsoft bug: Open Internet Explorer. From the Settings (gear) menu, select Internet Options/Privacy Tab/Settings Advanced Button. Notice that the Third-party cookies radio button does say "Accept". Nevertheless, now click "Block", Click "Accept" again and then Ok, Ok your way out. Yes, you are setting it right back to where it started! Each user needs to do this separately.
- ( C ) Give the user a better user experience and productivity.
For this, I change some settings, but this is a personal preference:
- Make Google Chrome the default browser in settings, default apps
- Make Adobe Acrobat the default PDF reader by opening a PDF
- I remove the system management ‘tiles’ in the start menu
- I switch off all notifications in Windows settings
I installed Image Resizer for Windows 3.1.2: a free utility that lets you resize one or more selected image files directly from Windows Explorer by right-clicking. (similar to the old Microsoft's Image Resizer Powertoy for Windows XP.) The smarter user is always interested in optimizing their content size.
I installed Greenshot: a light-weight screenshot software to capture a selected region, window or fullscreen. Users also can easily annotate, highlight or obfuscate parts of the screenshot, and can export the screenshot in various ways: save to file, send to printer, copy to clipboard, attach to e-mail, send Office programs, and others.
I bring Windows Photo Viewer back to the front by installing a small registry fix. This also allows restoring Windows Photo Viewer to be able to select to open image files in Default apps, Default Programs, and Open with for only your account or all users.
Have a question about something in this article? You can receive help directly from the article author. Sign up for a free trial to get started.
Comments (0)