Installing, Configuring, and Managing WSUS


Published:
Browse All Articles > Installing, Configuring, and Managing WSUS
This article will review the basic installation and configuration for Windows Software Update Services (WSUS) in a Windows 2012 R2 environment. WSUS is a Microsoft tool that allows administrators to manage and control updates to be approved and installed in their environment.
We will cover the following topics:
For our test environment, we will use 3 Windows 2012 R2 servers with the following roles:
We already have a domain controller (DC1) and Certificate Authority (CA1) for mydomain.local in place.
A Windows 7 Enterprise system will also be used for this environment.
We will start with installing the WSUS role on the WSUS server.
Login to the server with an account having local administrator rights.
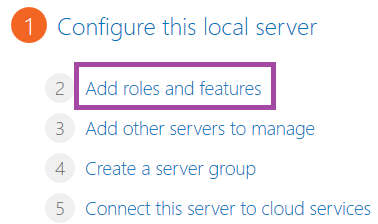
Open Server Manager and go to Add roles and features.
![WSUS-2015-06-03-20-47-32.png]() Click next on the 'Before you begin' then next again on the 'Installation Type' pages.
Click next on the 'Before you begin' then next again on the 'Installation Type' pages.
On the Server Selection page, select the current server if it isn't already; click next.
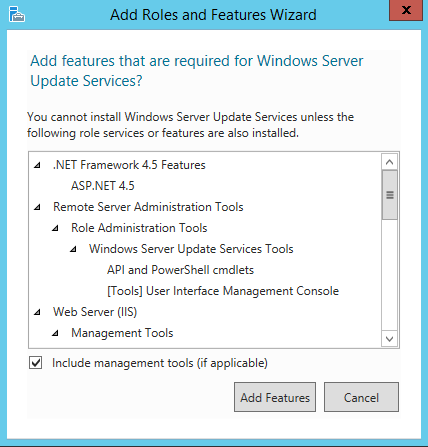
For Server Roles, scroll to the bottom and check Windows Server Update Services. This will bring up a dialog box to install dependent features. Click add features.
![WSUS-2015-06-03-21-08-00.png]()
![WSUS-2015-06-03-21-08-14.png]() Click next.
Click next.
It will then go to the Features page. You can leave the options as they are and click next.
Now we are at the WSUS configuration point. Click next at the first screen.
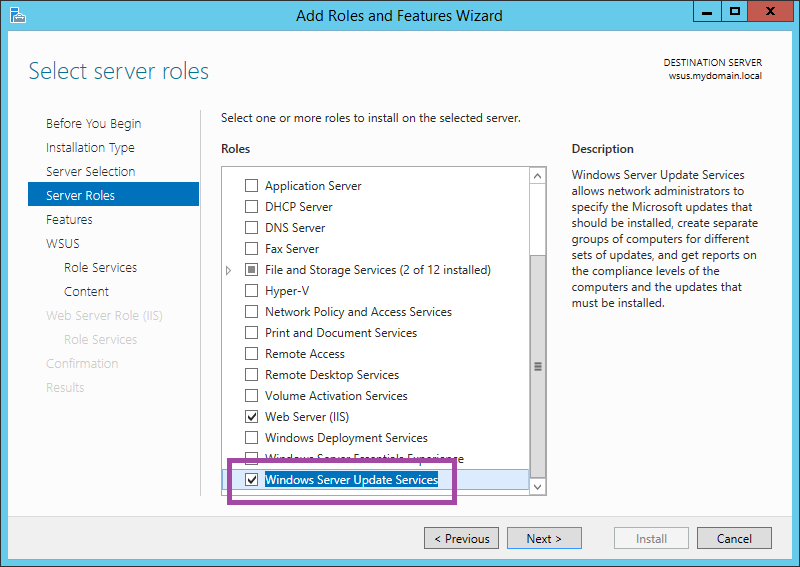
On the Role Services screen, you have 3 options:
Since we will be having both the WSUS service and database on this server, we will leave the default options selected.
![WSUS-2015-06-03-21-28-30.png]() The difference between WID Database and Database is the version of SQL being used.
The difference between WID Database and Database is the version of SQL being used.
WID (Windows Internal Database) is also knows as SQL Server Embedded Edition which is only used for Windows services. For larger installations and/or more advanced users, you could select Database which allows connecting to a full, supported installation of SQL server. Click next.
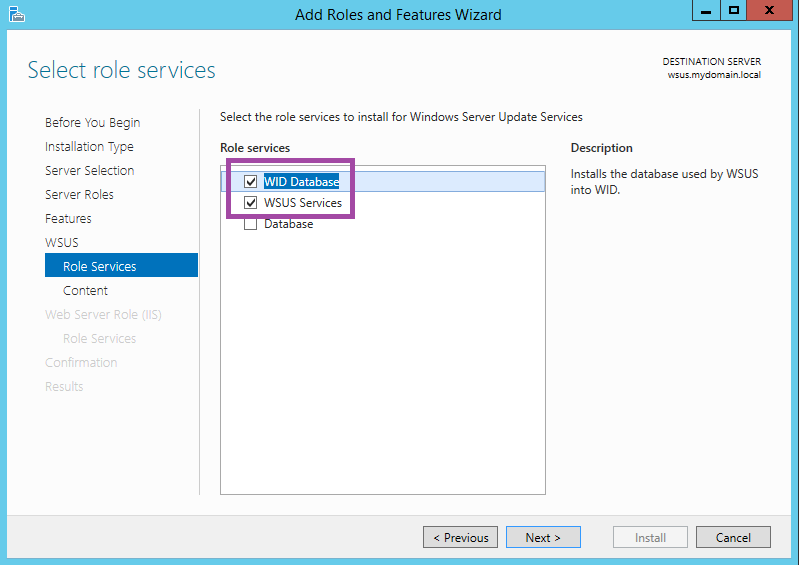
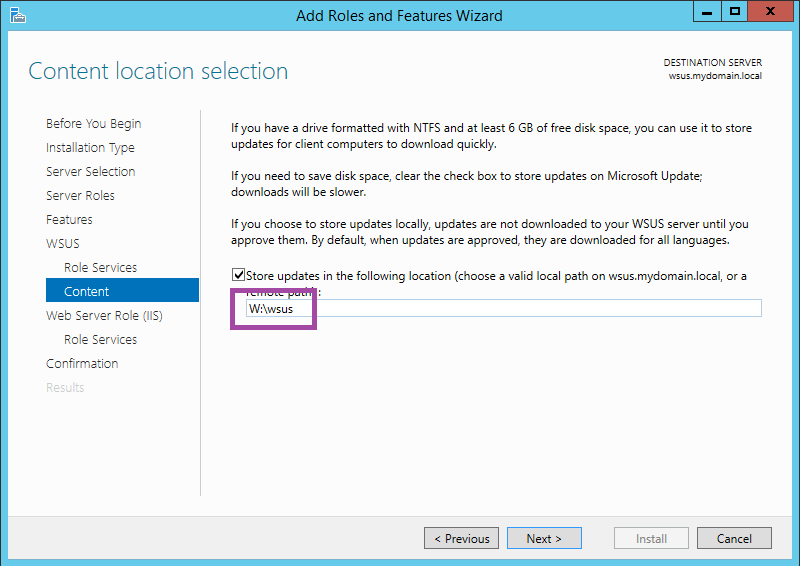
The next screen will allow you to specify where the downloaded updates to be used by clients will be stored. You can store them in any empty folder though recommend a separate volume if available (easier when a virtual machine). For this environment, I have added a second virtual disk as drive W and will place the downloads in W:\wsus.
![WSUS-2015-06-03-21-41-53.png]() Click next.
Click next.
Since IIS is required for WSUS, it will now ask for the IIS role services to install. Leave the selections checked for what is required for WSUS. Click next.
At the confirmation page, click install. The process will take a couple minutes to complete.
Once it has completed, click Launch Post-Installation tasks.
![WSUS-2015-06-03-23-24-41.png]() After a couple more minutes, it will say Configuration successfully completed. Click close.
After a couple more minutes, it will say Configuration successfully completed. Click close.
You will need to also download and install the Microsoft Report Viewer 2008 Redistributable which allows for viewing reports in the WSUS console. You can download here.
Note that it requires .net framework 2.0 which can be installed through server manager (add roles and features).
Here we will configure WSUS to use SSL. Note that not all communication uses SSL, only the metadata. 5 out of 9 WSUS folders in IIS can be configured for SSL use. By default, WSUS in Windows 2012 R2 uses port 8530 for http traffic and port 8531 for https traffic.
First thing we need to do is generate the certificate. We already have a CA for the domain in place, so we will use this.
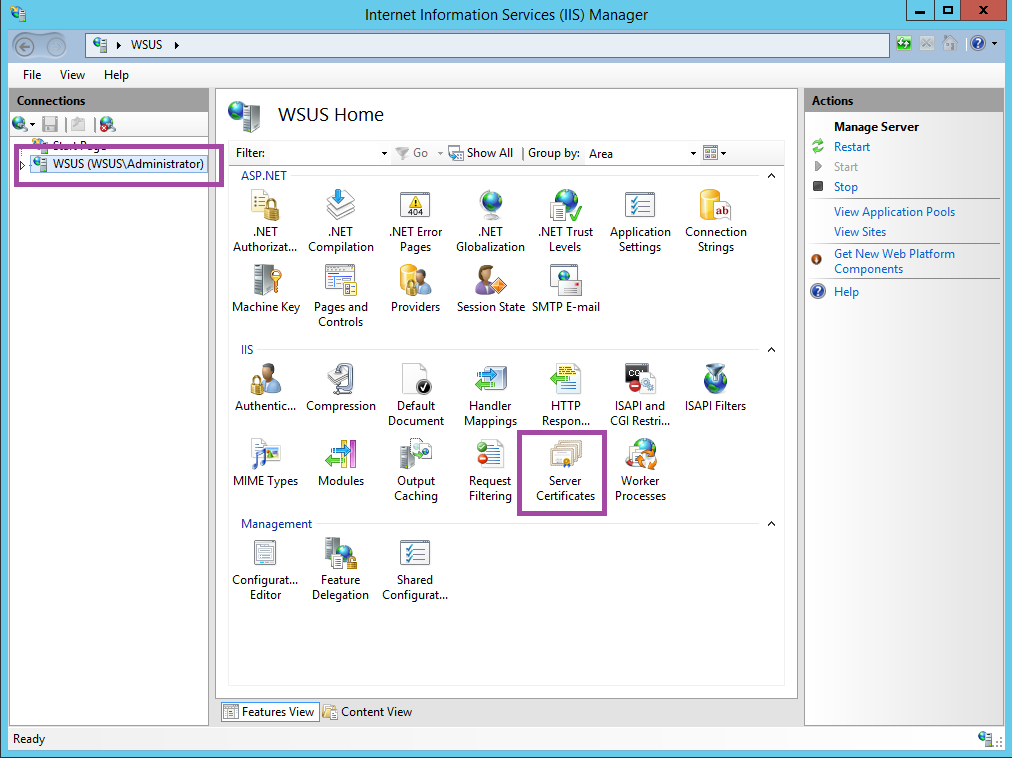
To get the certificte, open IIS manager on the WSUS server. On the left pane, click on the server name. Then in the middle pane, double click server certificates.
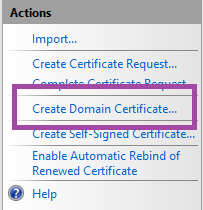
![WSUS-2015-06-04-01-12-23.png]() In the action pane on the right, click Create Domain Certificate...
In the action pane on the right, click Create Domain Certificate...
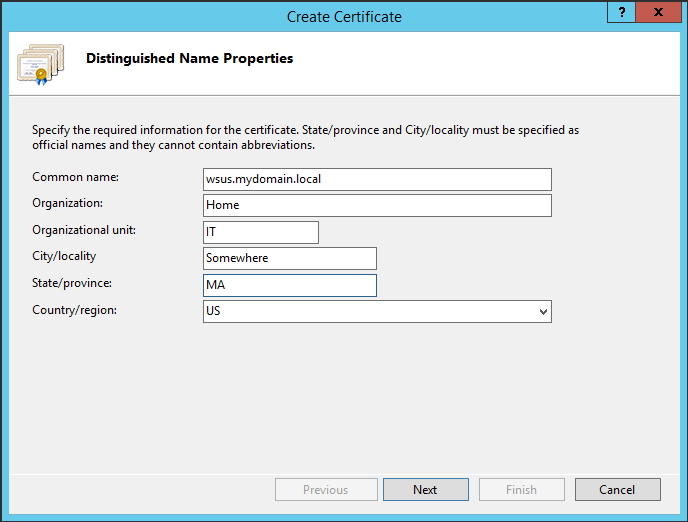
![WSUS-2015-06-04-01-14-02.png]() The create certificate dialog box will appear. Fill in the info as it is relevant for your environment. "Common name" should be the FQDN of the WSUS server. Once that is complete, click next.
The create certificate dialog box will appear. Fill in the info as it is relevant for your environment. "Common name" should be the FQDN of the WSUS server. Once that is complete, click next.
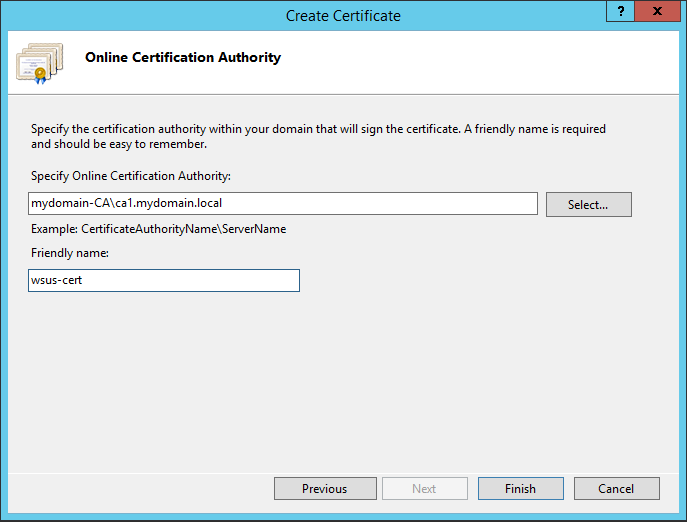
![WSUS-2015-06-04-01-20-17.png]() The next screen is where you specify the CA server. Click the select button and your domain CA server will appear.
The next screen is where you specify the CA server. Click the select button and your domain CA server will appear.
Give it a friendly name. It is only a description to help identify the certificate. Click finish.
![WSUS-2015-06-04-01-23-06.png]()
You will now see the certificate you just created.
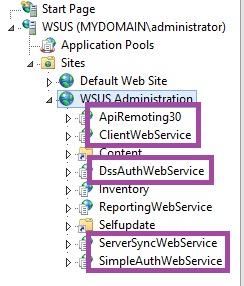
![WSUS-2015-06-04-01-29-43.png]() We need to now secure the folders. In IIS Manager, expand sites and WSUS Administration. The 5 folders we will secure are ApiRemoting30, ClientWebService, DssAuthWebService, ServerSyncWebService and SimpleAuthWebService.
We need to now secure the folders. In IIS Manager, expand sites and WSUS Administration. The 5 folders we will secure are ApiRemoting30, ClientWebService, DssAuthWebService, ServerSyncWebService and SimpleAuthWebService.
![WSUS-2015-06-04-14-07-45.png]() To secure, click on ApiRemoting30 and in the middle pane, double click the SSL Settings padlock icon.
To secure, click on ApiRemoting30 and in the middle pane, double click the SSL Settings padlock icon.
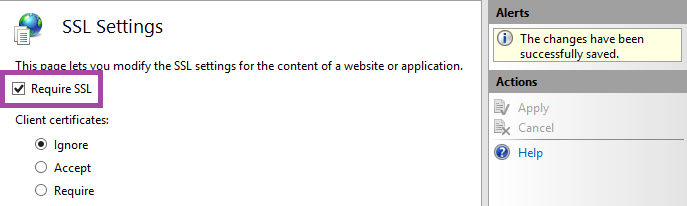
Check the box Require SSL and click apply in the action pane on the right.
![WSUS-2015-06-04-14-18-30.png]()
Repeat this for the other 4 folders.
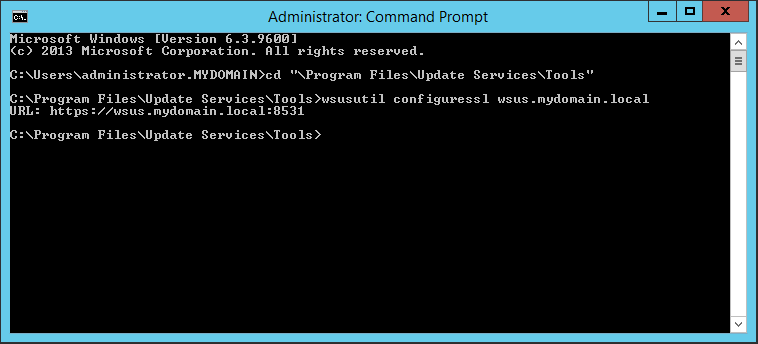
The next step is to configure SSL on the WSUS root. There is a command line utility that will configure this for us; no need to manually change settings in IIS. Open an elevated command prompt and navigate to C:\Program Files\Update Services\Tools and type the following: wsusutil configuressl wsus.mydomain.local
Replace wsus.mydomain.local with the FQDN of your wsus server. The output will show the URL on port 8531 indicating SSL has been configured.
![WSUS-2015-06-04-14-28-41.png]()
The last part of this section is to configure bindings for the site to use the certificate. In IIS manager, right click WSUS Administration on the left and select Edit Bindings. Click on https and click Edit. Under SSL certificate, click the drop down list and select the certificate you created earlier (or whichever one you plan to use). Click ok then close.
The first time you launch the console you are presented with the configuration wizard. Click next at the Before You Begin page. Decide if you want to join the Microsoft Update Improvement Program and click next. The next screen asks where you want to get updates from. If this is the first WSUS server, you would need to synchronize from Microsoft Update else you would probably be pulling updates from an existing WSUS server. Click next. If you don't have a proxy server, click next otherwise check the box to use a proxy server and fill in the details.
The next screen allows you to do an initial connection to the download location and retrieve the list of updates and languages that are available. Click the Start Connecting button. The process will take a few minutes. Once it finishes, click next. Select the language(s) you are getting updates for. If not selecting anything other than english, click next. The next section has the product list. Scroll down and check the box(es) for the products you wish to download updates for. When you have finished, click next. Select the classifications you want then click next (you can always change these settings at a later time from the options window in the console). Now specify the synchronization schedule. Recommend at least once a day but you can do manually or more often if you require. Click next. The finished page allows you to do an initial synchronization. The products and classifications you selected will determine how long this initial synchronization will take so be patient. You can click finish on the What's Next screen.
At this point, the initial setup is complete. Now we will go through some of the options of the console.
Expand the computer then updates and computers. If you select Synchronizations on the left, you will see all of the synchronization attempts on the right. The initial sync will be large; the number will vary depending on the products, classifications, and language(s) you selected.
![WSUS-2015-06-04-20-05-39.png]()
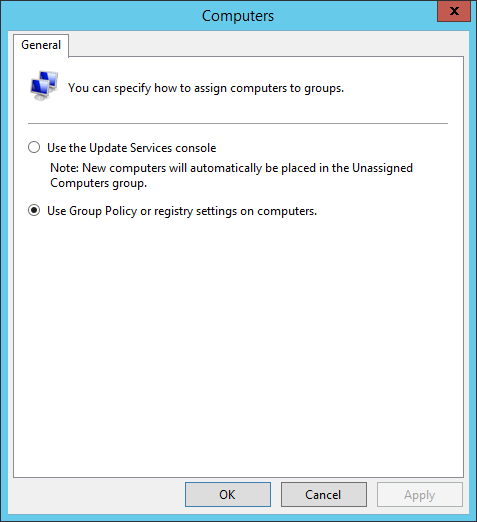
Before we start approving updates, we need to get the clients configured to use the WSUS server for updates to see which ones are required. It would not be practical to approve everything since some updates are superceded by others and would use unecessary disk space. There are a couple things we need to do in the console first to get computers organized properly. The first is to tell WSUS to use group policy for computer groups. By default, they need to be moved manually. To change this, click options on the left then computers on the right. Select the second option to use group policy or registry settings.
![WSUS-2015-06-04-20-17-21.png]()
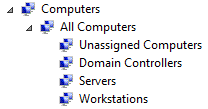
The second thing is to create the computer groups where the computers will be placed. Since we have an OU for servers, workstations and domain controllers, we will create a group for each. On the left side under Computers, right click on All Computers and select Add Computer Group. Create a group for each of those 3. You are not required to do it this way but for the sake of simplicity we will use the same names.
![WSUS-2015-06-04-20-21-37.png]()
The process to configure WSUS options for systems is done through group policy which is discussed next.
In order to get clients to talk to the WSUS and receive updates, Group Policy needs to be configured.
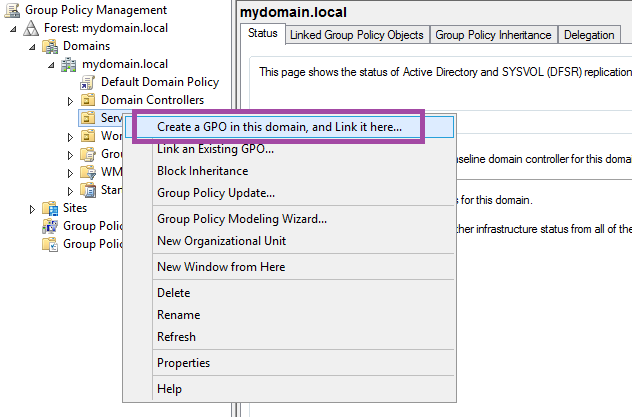
To do this, open Group Policy Management on the domain controller (or other server having the feature installed). Expand the forest and domain. In this test environment, we have an OU for servers and an OU for workstations. The WSUS and CA servers are in the servers OU. Right click Servers and select Create a new GPO in this domain, and Link it here.
![DC1-2015-06-04-14-45-53.png]()
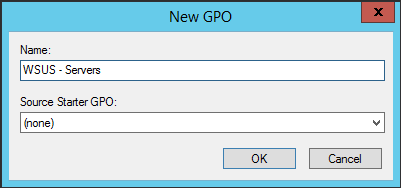
For this example, I will name it WSUS - Servers.
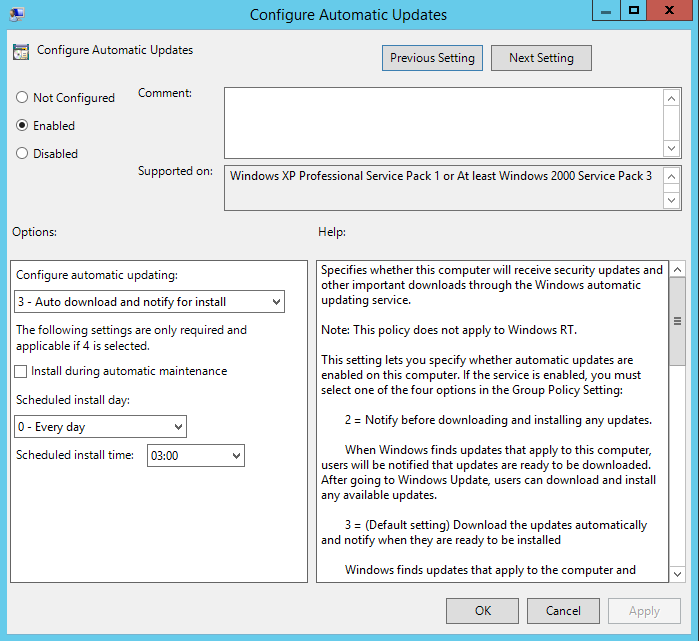
![DC1-2015-06-04-15-02-12.png]() Right click on this new GPO and select edit. Under computer configuration, expand policies, administrative templates, windows components and scroll down to windows update. We don't need to configure every setting but there are a few that are required to get systems talking to WSUS. The first one is Configure Automatic Updates. Let's enable it and select auto download and notify for install since you generally don't want updates automatically installed and the system rebooted on its own. You can also specify the day and time you would like the system to check for updates. The default of 3am daily is fine.
Right click on this new GPO and select edit. Under computer configuration, expand policies, administrative templates, windows components and scroll down to windows update. We don't need to configure every setting but there are a few that are required to get systems talking to WSUS. The first one is Configure Automatic Updates. Let's enable it and select auto download and notify for install since you generally don't want updates automatically installed and the system rebooted on its own. You can also specify the day and time you would like the system to check for updates. The default of 3am daily is fine.
![DC1-2015-06-04-20-34-43.png]()
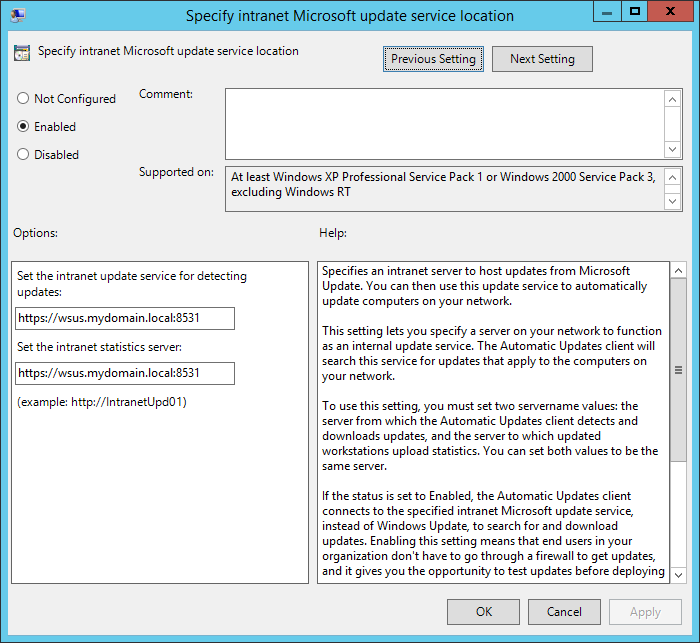
The second option we need to configure is the WSUS server. Double click on Specify intranet Microsoft update service location. Select the enable radio button and type the URL for the WSUS server in both boxes. Make sure you use the FQDN and the port number. If you opted to configure SSL, specify port 8531 with https otherwise use http on port 8530.
![DC1-2015-06-04-20-39-09.png]()
The third required option is Enable client-side targeting. This setting will put the systems in this OU where this GPO is applied into the correct computer group we created before. Since this GPO is for servers, we will put in the servers group.
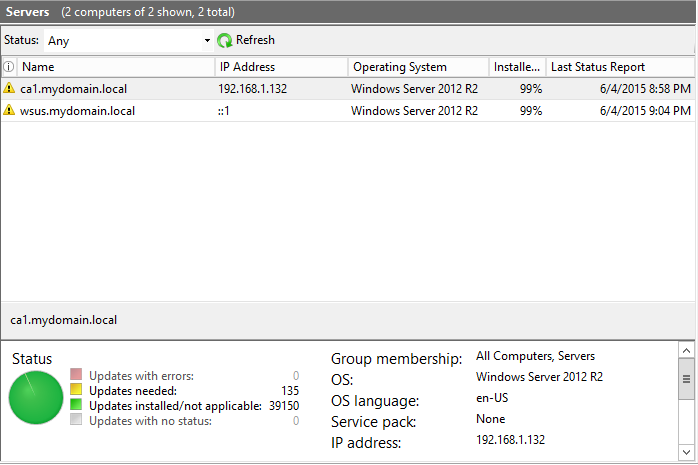
![DC1-2015-06-04-20-42-24.png]() There are a number of other options available. You can double click on any of them and read the help secton for a detailed explanation and see if it is a setting you want to use in your environment. Once the group policy is received by the system(s) in that OU, the windows update settings will be applied and will start to look to the WSUS server for updates. After a little while, we will see the CA and WSUS servers (in the servers OU) appear in the console under the servers computer group.
There are a number of other options available. You can double click on any of them and read the help secton for a detailed explanation and see if it is a setting you want to use in your environment. Once the group policy is received by the system(s) in that OU, the windows update settings will be applied and will start to look to the WSUS server for updates. After a little while, we will see the CA and WSUS servers (in the servers OU) appear in the console under the servers computer group.
![WSUS-2015-06-04-21-25-41.png]() As you can see from the botton pane, it can see that a number of updates are needed. However, they will not appear on the server when running windows update because they have not yet been approved. The next section will discuss this process.
As you can see from the botton pane, it can see that a number of updates are needed. However, they will not appear on the server when running windows update because they have not yet been approved. The next section will discuss this process.
You can also configure systems to use WSUS that are not part of a domain. On the machine you want to configure, run gpedit.msc which will open the local group policy editor and navigate down to Administrative Templates -> Windows Componetns -> Windows Update then edit the same values as mentioned above in the group policy.
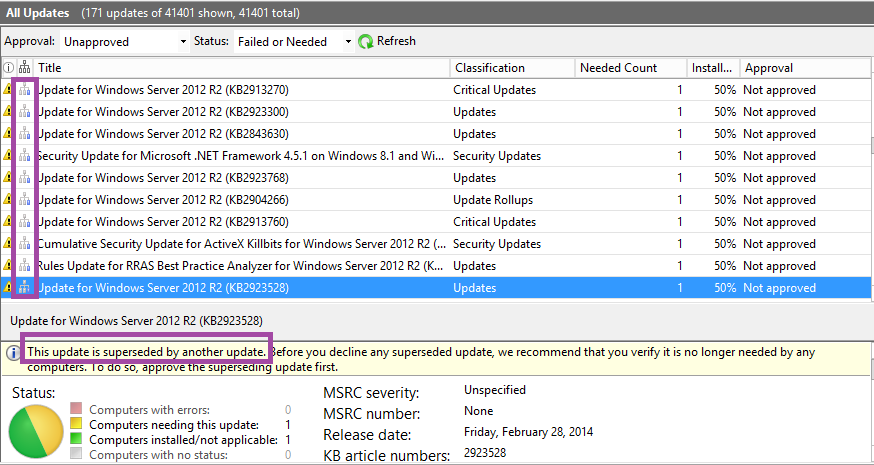
When configuring WSUS following the first synchronization, it will take time to sort through all the updates and determining which ones to approve. We will review some basic tasks though the process might be slightly different depending on the environment and policies of the organization. Open the WSUS console and expand the server and updates; click on All Updates. By default, the view shows unapproved and failed or needed. It will show title, classification, install % and approval columns. To make things a little easier, I suggest adding supersedence, needed count and arrival date columns. You can do this by right clicking anywhere on the column headers and click the one you want to add (or remove). Having these columns present will allow you to sort on these fields to make it easier to decline superseded updates on patch tuesday and to see how many systems need updates. The supersedence column has an icon similar to that of an organization chart to the left of the title column. If you click on that icon it will sort by status - if it's superseded, superseding another update or neither (no icon).
This part of the list shows superseded updates. You'll notice the icon has a blue shading on the bottom.
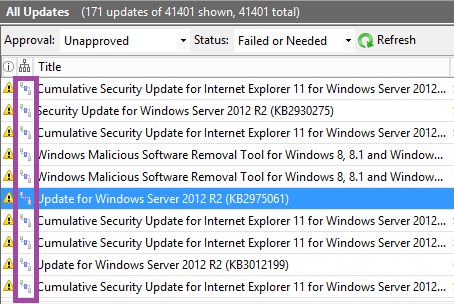
![WSUS-2015-06-04-23-30-42.png]() If you scroll up in the list, you see a different icon where the blue shading is in the middle. This means the update is superseded by another update and also supersedes a previous update.
If you scroll up in the list, you see a different icon where the blue shading is in the middle. This means the update is superseded by another update and also supersedes a previous update.
![WSUS-2015-06-04-23-34-52.png]()
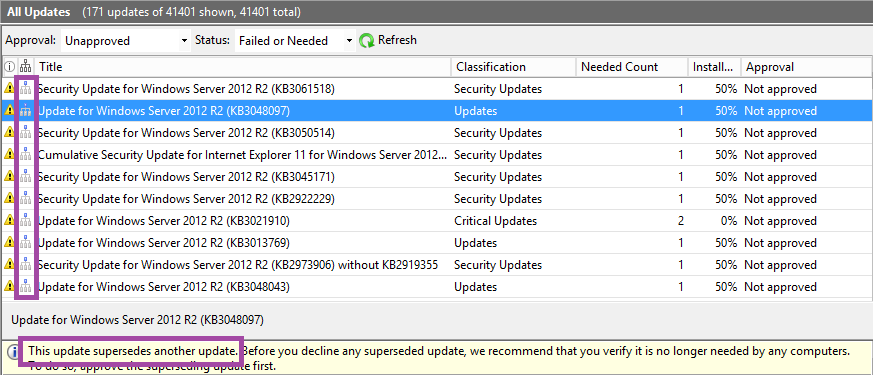
The other icon with the blue shading at the top indicates it supersedes another update.
![WSUS-2015-06-04-23-37-50.png]()
If you chose to decline superseded updates, you can simply select them, right click and select decline.
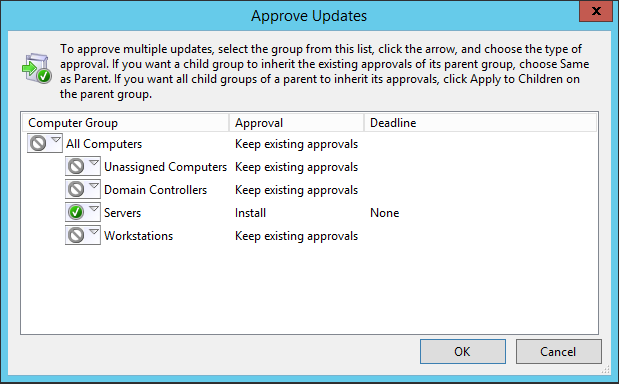
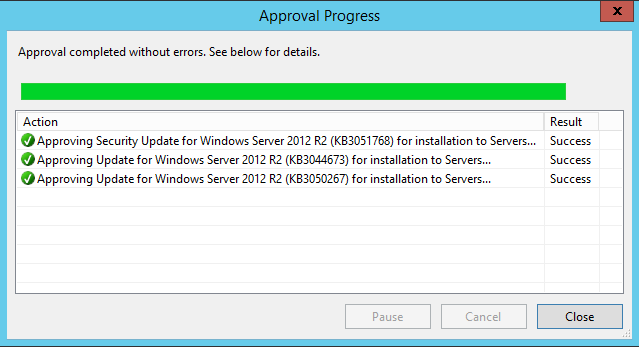
To approve updates, simply select them, right click and select approve. You can then select the computer group(s) you wish to approve installation for. This is the same place where you can also approve for removal or not approved. In this case, I have selected three Windows 2012 R2 updates to approve for the Servers group.
![WSUS-2015-06-05-00-57-07.png]()
![WSUS-2015-06-05-00-59-12.png]()
![WSUS-2015-06-05-00-59-54.png]()
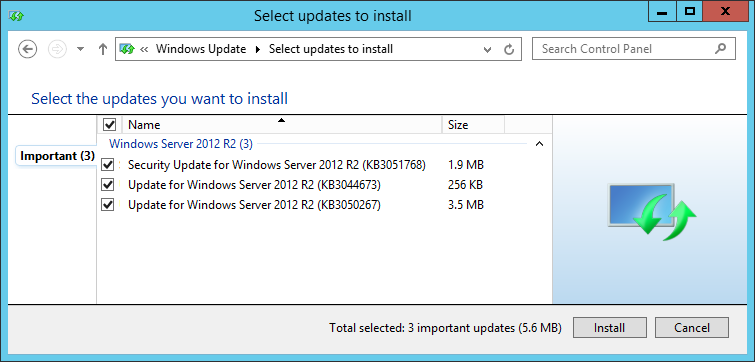
Now when we run windows update on the WSUS server, those 3 updates are available to install.
![WSUS-2015-06-05-12-15-53.png]()
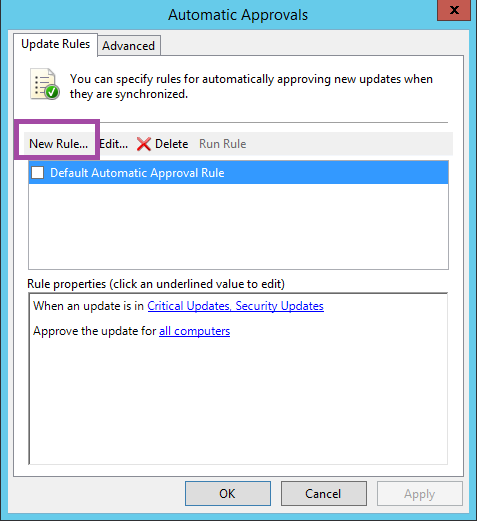
WSUS also has the ability to automatically approve updates. For the most part, this is probably not something you want to do since there are rare occasions when a released update is removed because of a security or technical concern. The only time I have automatically approved updates is for windows defender definition files which are released frequently. To automatically approve an update, click options on the bottom left of the console and on the right, click on Automatic Approvals. Click the New Rule button.
![WSUS-2015-06-05-18-24-12.png]()
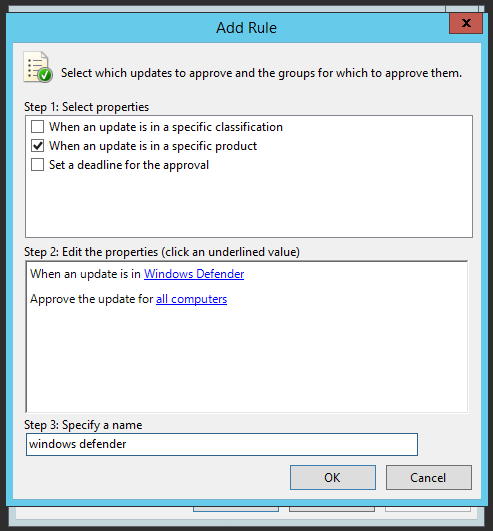
For this example, we will automatically approve windows defender updates. Under step 1, check the second box for a specific product. On the bottom where it says any product in blue, click on it and it will open the products list. Everything will be checked. Click the box next to All Products to remove the selection. Scroll down near the bottom and find windows defender in the Windows section and check that one box then click ok. Give it a name for the rule at the bottom and click ok.
![WSUS-2015-06-05-18-39-13.png]()
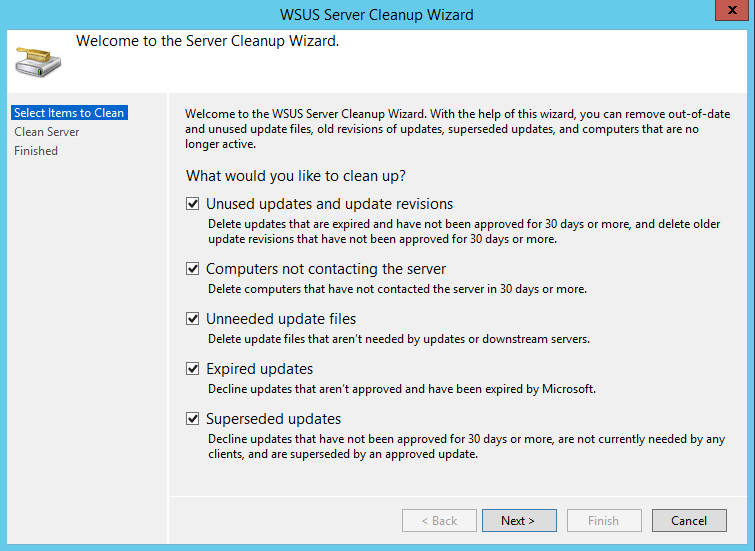
WSUS also provides a tool to cleanup your environment. As time passes, updates accumulate taking up disk space. This can be done using the Server Cleanup Wizard which can be found under options.
![WSUS-2015-06-05-18-59-43.png]()
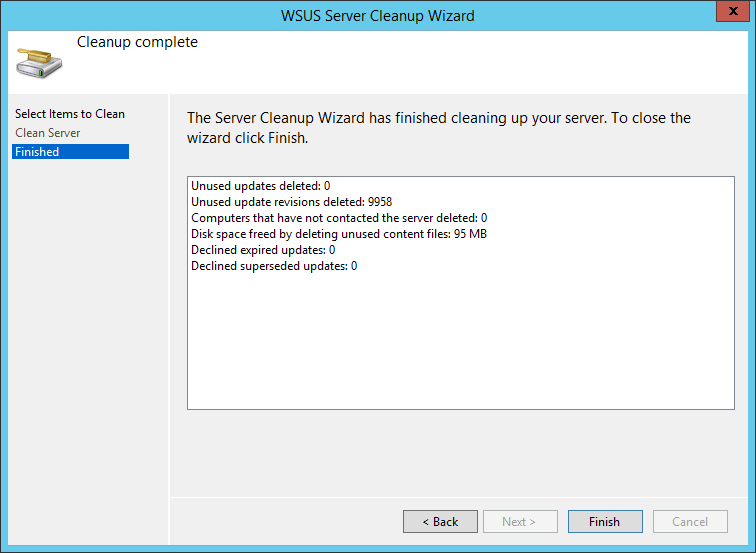
I typically have ran this wizard once a month, specifically after updates are released on patch tuesday and have declined updates that have been superseded. Once it runs, it will give you a summary of what was done in terms of updates removed or disk space freed.
![WSUS-2015-06-05-20-44-09.png]()
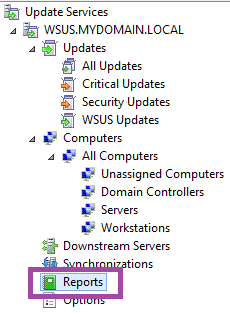
WSUS comes with some reports for you to look at the status of updates. The list is not extensive, but you can still get an overview of updates and computers. This can be access by the reports menu on the left.
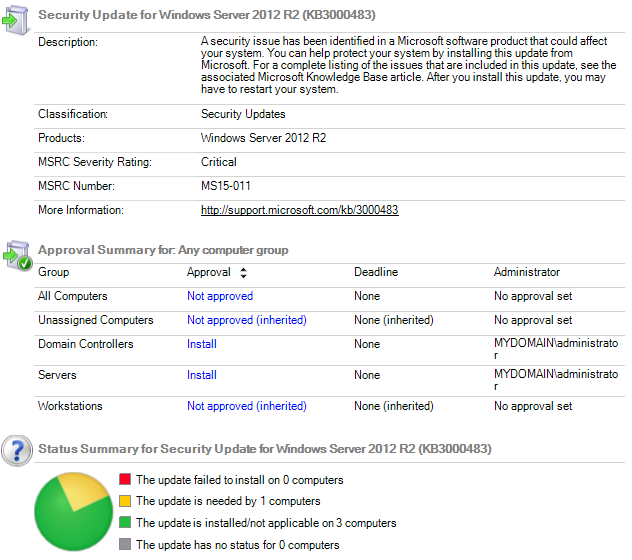
![WSUS-2015-06-06-20-54-47.png]() You can go update by update to see the installation status and also see what computer group(s) it is installed for.
You can go update by update to see the installation status and also see what computer group(s) it is installed for.
![WSUS-2015-06-06-20-58-04.png]()
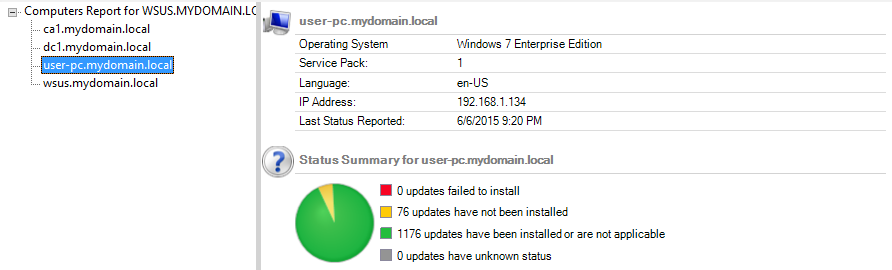
You can also go by computer and see the update status for that system.
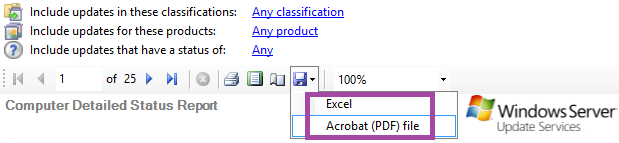
![WSUS-2015-06-06-21-23-55.png]() Data is available to export to xls and pdf formats.
Data is available to export to xls and pdf formats.
![WSUS-2015-06-06-21-31-47.png]()
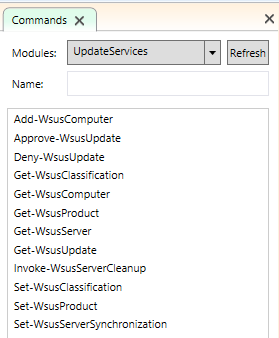
WSUS does come with about a dozen PowerShell cmdlets (as seen through the ISE).
![WSUS-2015-06-09-14-19-36.png]()
Here is some output from a couple commands:
A complete reference for each command can be found here:
https://msdn.microsoft.com/en-us/library/hh826166%28v=wps.620%29.aspx
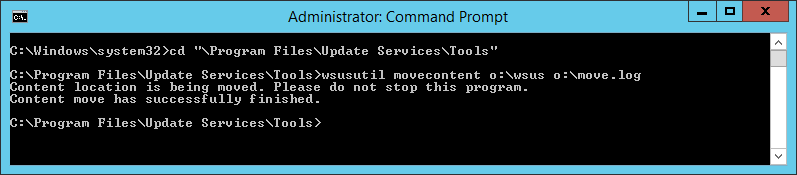
There is a nice little utility called wsusutil which is found in the \Program Files\Update Services\Tools folder. There are several different options available, but here will only highlight one option - content relocation (we previously mentioned this command when implementing ssl). You might run into a situation where you are low on disk space and you want to add an additional volume to relocate the content. This is where this utility comes in handy. In this example, I have added a virtual disk to the wsus server as drive O and will demonstrate how to move the content from drive W using the same \wsus path. The command line you would use is
wsusutil movecontent
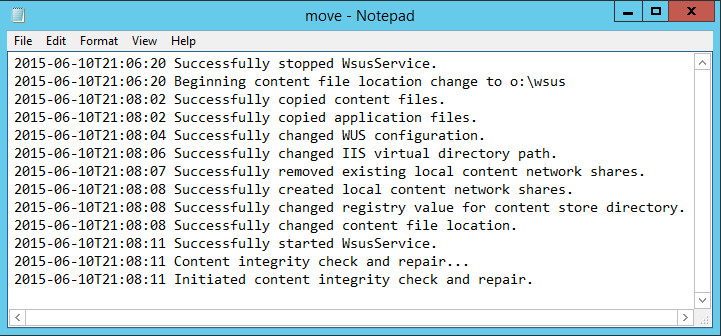
In this case, we would use wsusutil movecontent o:\wsus o:\move.log
![WSUS-2015-06-10-17-21-11.png]()
Here is the log file:
![WSUS-2015-06-10-17-22-53.png]() A complete listing of all the command line options can be found here.
A complete listing of all the command line options can be found here.
Hopefully this article proved useful for getting up and running with wsus.
It can be difficult sometimes to get all required patches on all systems but ideally our console would look like this:
Thank you for taking the time to view this article. Please provide any suggestions or feedback if you found this to be helpful.
Don't forget to click the green button below if you liked this article.
We will cover the following topics:
- Installing the WSUS Role
- Securing WSUS with SSL
- Configuring WSUS
- Configuring Group Policy
- Managing Updates
- Viewing Reports
- Using PowerShell
- Using wsusutil
For our test environment, we will use 3 Windows 2012 R2 servers with the following roles:
- Domain controller
- CA server (enterprise root)
- WSUS
We already have a domain controller (DC1) and Certificate Authority (CA1) for mydomain.local in place.
A Windows 7 Enterprise system will also be used for this environment.
We will start with installing the WSUS role on the WSUS server.
Installing the WSUS Role
Login to the server with an account having local administrator rights.
Open Server Manager and go to Add roles and features.
 Click next on the 'Before you begin' then next again on the 'Installation Type' pages.
On the Server Selection page, select the current server if it isn't already; click next.
For Server Roles, scroll to the bottom and check Windows Server Update Services. This will bring up a dialog box to install dependent features. Click add features.
 Click next.
It will then go to the Features page. You can leave the options as they are and click next.
Now we are at the WSUS configuration point. Click next at the first screen.
On the Role Services screen, you have 3 options:
- WID Database
- WSUS Services
- Database
Since we will be having both the WSUS service and database on this server, we will leave the default options selected.
 The difference between WID Database and Database is the version of SQL being used.
WID (Windows Internal Database) is also knows as SQL Server Embedded Edition which is only used for Windows services. For larger installations and/or more advanced users, you could select Database which allows connecting to a full, supported installation of SQL server. Click next.
The next screen will allow you to specify where the downloaded updates to be used by clients will be stored. You can store them in any empty folder though recommend a separate volume if available (easier when a virtual machine). For this environment, I have added a second virtual disk as drive W and will place the downloads in W:\wsus.
 Click next.
Since IIS is required for WSUS, it will now ask for the IIS role services to install. Leave the selections checked for what is required for WSUS. Click next.
At the confirmation page, click install. The process will take a couple minutes to complete.
Once it has completed, click Launch Post-Installation tasks.
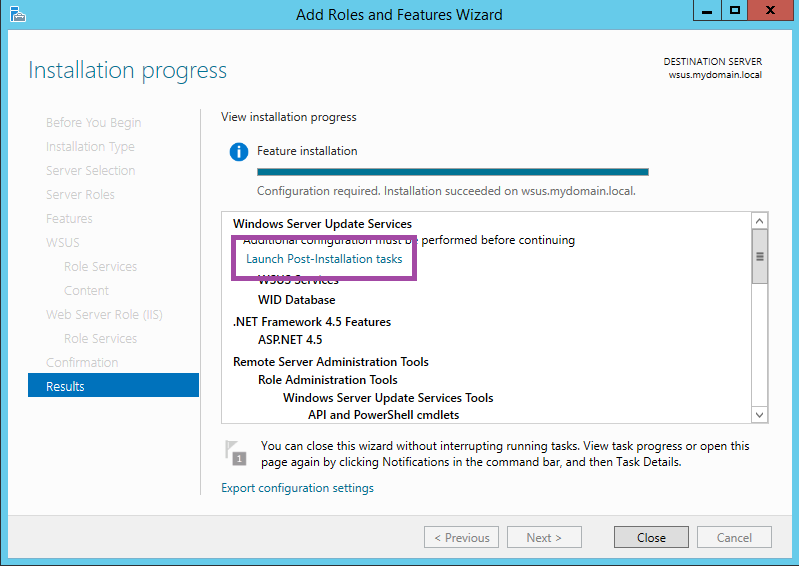 After a couple more minutes, it will say Configuration successfully completed. Click close.
You will need to also download and install the Microsoft Report Viewer 2008 Redistributable which allows for viewing reports in the WSUS console. You can download here.
Note that it requires .net framework 2.0 which can be installed through server manager (add roles and features).
Securing WSUS with SSL
Here we will configure WSUS to use SSL. Note that not all communication uses SSL, only the metadata. 5 out of 9 WSUS folders in IIS can be configured for SSL use. By default, WSUS in Windows 2012 R2 uses port 8530 for http traffic and port 8531 for https traffic.
First thing we need to do is generate the certificate. We already have a CA for the domain in place, so we will use this.
To get the certificte, open IIS manager on the WSUS server. On the left pane, click on the server name. Then in the middle pane, double click server certificates.
 In the action pane on the right, click Create Domain Certificate...
 The create certificate dialog box will appear. Fill in the info as it is relevant for your environment. "Common name" should be the FQDN of the WSUS server. Once that is complete, click next.
 The next screen is where you specify the CA server. Click the select button and your domain CA server will appear.
Give it a friendly name. It is only a description to help identify the certificate. Click finish.
You will now see the certificate you just created.
 We need to now secure the folders. In IIS Manager, expand sites and WSUS Administration. The 5 folders we will secure are ApiRemoting30, ClientWebService, DssAuthWebService, ServerSyncWebService and SimpleAuthWebService.
 To secure, click on ApiRemoting30 and in the middle pane, double click the SSL Settings padlock icon.
Check the box Require SSL and click apply in the action pane on the right.
Repeat this for the other 4 folders.
The next step is to configure SSL on the WSUS root. There is a command line utility that will configure this for us; no need to manually change settings in IIS. Open an elevated command prompt and navigate to C:\Program Files\Update Services\Tools and type the following: wsusutil configuressl wsus.mydomain.local
Replace wsus.mydomain.local with the FQDN of your wsus server. The output will show the URL on port 8531 indicating SSL has been configured.
The last part of this section is to configure bindings for the site to use the certificate. In IIS manager, right click WSUS Administration on the left and select Edit Bindings. Click on https and click Edit. Under SSL certificate, click the drop down list and select the certificate you created earlier (or whichever one you plan to use). Click ok then close.
Configuring WSUS
The first time you launch the console you are presented with the configuration wizard. Click next at the Before You Begin page. Decide if you want to join the Microsoft Update Improvement Program and click next. The next screen asks where you want to get updates from. If this is the first WSUS server, you would need to synchronize from Microsoft Update else you would probably be pulling updates from an existing WSUS server. Click next. If you don't have a proxy server, click next otherwise check the box to use a proxy server and fill in the details.
The next screen allows you to do an initial connection to the download location and retrieve the list of updates and languages that are available. Click the Start Connecting button. The process will take a few minutes. Once it finishes, click next. Select the language(s) you are getting updates for. If not selecting anything other than english, click next. The next section has the product list. Scroll down and check the box(es) for the products you wish to download updates for. When you have finished, click next. Select the classifications you want then click next (you can always change these settings at a later time from the options window in the console). Now specify the synchronization schedule. Recommend at least once a day but you can do manually or more often if you require. Click next. The finished page allows you to do an initial synchronization. The products and classifications you selected will determine how long this initial synchronization will take so be patient. You can click finish on the What's Next screen.
At this point, the initial setup is complete. Now we will go through some of the options of the console.
Expand the computer then updates and computers. If you select Synchronizations on the left, you will see all of the synchronization attempts on the right. The initial sync will be large; the number will vary depending on the products, classifications, and language(s) you selected.

Before we start approving updates, we need to get the clients configured to use the WSUS server for updates to see which ones are required. It would not be practical to approve everything since some updates are superceded by others and would use unecessary disk space. There are a couple things we need to do in the console first to get computers organized properly. The first is to tell WSUS to use group policy for computer groups. By default, they need to be moved manually. To change this, click options on the left then computers on the right. Select the second option to use group policy or registry settings.
The second thing is to create the computer groups where the computers will be placed. Since we have an OU for servers, workstations and domain controllers, we will create a group for each. On the left side under Computers, right click on All Computers and select Add Computer Group. Create a group for each of those 3. You are not required to do it this way but for the sake of simplicity we will use the same names.
The process to configure WSUS options for systems is done through group policy which is discussed next.
Configuring Group Policy
In order to get clients to talk to the WSUS and receive updates, Group Policy needs to be configured.
To do this, open Group Policy Management on the domain controller (or other server having the feature installed). Expand the forest and domain. In this test environment, we have an OU for servers and an OU for workstations. The WSUS and CA servers are in the servers OU. Right click Servers and select Create a new GPO in this domain, and Link it here.
For this example, I will name it WSUS - Servers.
 Right click on this new GPO and select edit. Under computer configuration, expand policies, administrative templates, windows components and scroll down to windows update. We don't need to configure every setting but there are a few that are required to get systems talking to WSUS. The first one is Configure Automatic Updates. Let's enable it and select auto download and notify for install since you generally don't want updates automatically installed and the system rebooted on its own. You can also specify the day and time you would like the system to check for updates. The default of 3am daily is fine.
The second option we need to configure is the WSUS server. Double click on Specify intranet Microsoft update service location. Select the enable radio button and type the URL for the WSUS server in both boxes. Make sure you use the FQDN and the port number. If you opted to configure SSL, specify port 8531 with https otherwise use http on port 8530.
The third required option is Enable client-side targeting. This setting will put the systems in this OU where this GPO is applied into the correct computer group we created before. Since this GPO is for servers, we will put in the servers group.
 There are a number of other options available. You can double click on any of them and read the help secton for a detailed explanation and see if it is a setting you want to use in your environment. Once the group policy is received by the system(s) in that OU, the windows update settings will be applied and will start to look to the WSUS server for updates. After a little while, we will see the CA and WSUS servers (in the servers OU) appear in the console under the servers computer group.
 As you can see from the botton pane, it can see that a number of updates are needed. However, they will not appear on the server when running windows update because they have not yet been approved. The next section will discuss this process.
You can also configure systems to use WSUS that are not part of a domain. On the machine you want to configure, run gpedit.msc which will open the local group policy editor and navigate down to Administrative Templates -> Windows Componetns -> Windows Update then edit the same values as mentioned above in the group policy.
Managing Updates
When configuring WSUS following the first synchronization, it will take time to sort through all the updates and determining which ones to approve. We will review some basic tasks though the process might be slightly different depending on the environment and policies of the organization. Open the WSUS console and expand the server and updates; click on All Updates. By default, the view shows unapproved and failed or needed. It will show title, classification, install % and approval columns. To make things a little easier, I suggest adding supersedence, needed count and arrival date columns. You can do this by right clicking anywhere on the column headers and click the one you want to add (or remove). Having these columns present will allow you to sort on these fields to make it easier to decline superseded updates on patch tuesday and to see how many systems need updates. The supersedence column has an icon similar to that of an organization chart to the left of the title column. If you click on that icon it will sort by status - if it's superseded, superseding another update or neither (no icon).
This part of the list shows superseded updates. You'll notice the icon has a blue shading on the bottom.
 If you scroll up in the list, you see a different icon where the blue shading is in the middle. This means the update is superseded by another update and also supersedes a previous update.
The other icon with the blue shading at the top indicates it supersedes another update.
If you chose to decline superseded updates, you can simply select them, right click and select decline.
To approve updates, simply select them, right click and select approve. You can then select the computer group(s) you wish to approve installation for. This is the same place where you can also approve for removal or not approved. In this case, I have selected three Windows 2012 R2 updates to approve for the Servers group.

Now when we run windows update on the WSUS server, those 3 updates are available to install.
WSUS also has the ability to automatically approve updates. For the most part, this is probably not something you want to do since there are rare occasions when a released update is removed because of a security or technical concern. The only time I have automatically approved updates is for windows defender definition files which are released frequently. To automatically approve an update, click options on the bottom left of the console and on the right, click on Automatic Approvals. Click the New Rule button.
For this example, we will automatically approve windows defender updates. Under step 1, check the second box for a specific product. On the bottom where it says any product in blue, click on it and it will open the products list. Everything will be checked. Click the box next to All Products to remove the selection. Scroll down near the bottom and find windows defender in the Windows section and check that one box then click ok. Give it a name for the rule at the bottom and click ok.
WSUS also provides a tool to cleanup your environment. As time passes, updates accumulate taking up disk space. This can be done using the Server Cleanup Wizard which can be found under options.
I typically have ran this wizard once a month, specifically after updates are released on patch tuesday and have declined updates that have been superseded. Once it runs, it will give you a summary of what was done in terms of updates removed or disk space freed.
Viewing Reports
WSUS comes with some reports for you to look at the status of updates. The list is not extensive, but you can still get an overview of updates and computers. This can be access by the reports menu on the left.
 You can go update by update to see the installation status and also see what computer group(s) it is installed for.
You can also go by computer and see the update status for that system.
 Data is available to export to xls and pdf formats.
Using PowerShell
WSUS does come with about a dozen PowerShell cmdlets (as seen through the ISE).
Here is some output from a couple commands:
PS C:\Users\administrator.MYDOMAIN> Get-WsusClassification

                      Title                                                                                          ID
                      -----                                                                                          --
                      Applications                                                                                   5c9376ab-8ce6-464a-b136-22113dd69801
                      Critical Updates                                                                               e6cf1350-c01b-414d-a61f-263d14d133b4
                      Definition Updates                                                                             e0789628-ce08-4437-be74-2495b842f43b
                      Drivers                                                                                        ebfc1fc5-71a4-4f7b-9aca-3b9a503104a0
                      Feature Packs                                                                                  b54e7d24-7add-428f-8b75-90a396fa584f
                      Security Updates                                                                               0fa1201d-4330-4fa8-8ae9-b877473b6441
                      Service Packs                                                                                  68c5b0a3-d1a6-4553-ae49-01d3a7827828
                      Tools                                                                                          b4832bd8-e735-4761-8daf-37f882276dab
                      Update Rollups                                                                                 28bc880e-0592-4cbf-8f95-c79b17911d5f
                      Updates                                                                                        cd5ffd1e-e932-4e3a-bf74-18bf0b1bbd83


                      PS C:\Users\administrator.MYDOMAIN> Get-WsusComputer

                      Computer                                        IP Address                                      Operating System                               Last Status Report
                      --------                                        ----------                                      ----------------                               ------------------
                      ca1.mydomain.local                              192.168.1.132                                   Windows Server 2012 R2                         6/9/2015 6:10:39 PM
                      wsus.mydomain.local                             ::1                                             Windows Server 2012 R2                         6/9/2015 5:53:36 PM
                      dc1.mydomain.local                              192.168.1.131                                   Windows Server 2012 R2                         6/9/2015 5:55:19 PM
                      user-pc.mydomain.local                          192.168.1.134                                   Windows 7 Enterprise Edition                   6/9/2015 6:24:59 PM


                      PS C:\Users\administrator.MYDOMAIN> Get-WsusServer


                      Name : wsus.mydomain.local


                      PS C:\Users\administrator.MYDOMAIN> Invoke-WsusServerCleanup -CleanupObsoleteComputers -CleanupUnneededContentFiles -CleanupObsoleteUpdates -DeclineExpiredUpdates -DeclineSupersededUpdates -CompressUpdates
                      Obsolete Updates Deleted:0
                      Expired Updates Declined: 0
                      Obsolete Updates Deleted:0
                      Obsolete Computers Deleted:0
                      Diskspace Freed:627544560
Updates Compressed:350A complete reference for each command can be found here:
https://msdn.microsoft.com
Using wsusutil
There is a nice little utility called wsusutil which is found in the \Program Files\Update Services\Tools folder. There are several different options available, but here will only highlight one option - content relocation (we previously mentioned this command when implementing ssl). You might run into a situation where you are low on disk space and you want to add an additional volume to relocate the content. This is where this utility comes in handy. In this example, I have added a virtual disk to the wsus server as drive O and will demonstrate how to move the content from drive W using the same \wsus path. The command line you would use is
wsusutil movecontent
In this case, we would use wsusutil movecontent o:\wsus o:\move.log
Here is the log file:
 A complete listing of all the command line options can be found here.
Conclusion
Hopefully this article proved useful for getting up and running with wsus.
It can be difficult sometimes to get all required patches on all systems but ideally our console would look like this:
Thank you for taking the time to view this article. Please provide any suggestions or feedback if you found this to be helpful.
Don't forget to click the green button below if you liked this article.
Have a question about something in this article? You can receive help directly from the article author. Sign up for a free trial to get started.
Comments (8)
Commented:
Commented:
Just recently I configured a WSUS (on Server 2012 R2) for SSL and no clients could connect (not just Win10 clients) until I had edited the web.config file in "C:\Program Files\Update Services\WebServices\Clien
I think it's also important to note that the order of steps is important when configuring WSUS for SSL. As in the order you've shown, the IIS changes have to made before running the wsusutil configuressl <fqdn> command (if the output doesn't show the https with the 8531 port you know something isn't right).
Commented:
I have already followed these steps within my Server 2016 AD Domain and have given the two Server 2016 servers the "Target group name for this computer" the value of "Servers".
How can this value be added to all of the workstations within my domain through group policy without me having to manually add this value to each computer?
Commented:
- What are the purposes of installing SSL on WSUS server?
- What happens if I did not install SSL?
Author
Commented:encrypting communication between client and server
traffic between client and server is not encrypted; will still work
View More