NTFS. Allow create, edit, and delete files but not create folders

I love learning ways that Windows NTFS Security permissions can be used to solve security needs. This article is based on a solution I gave to an EE member: For a given folder, give the user or group the ability to create, edit, rename & delete files but not the ability to create folders. Note: The user's original question states a different need but is clarified in an added comment.
I had known about NTFS Special Permissions and wondered if there was a way to tune those checkboxes to get a certain result. In the past, I had seen user requests for a solution like this but could not find a solution on EE or elsewhere. So, I thought it couldn't be done and left it at that. But, the requests sporadically popped up and those nagging NTFS Special Permissions were on my mind!
So, I decided to play with it.
Some Notes:
- Earlier, I mentioned I could not find a solution. If you have found one, please let me know in the comments section below!
- The application of this solution leaves something to be desired. Although it achieves the result, getting there is a bit 'offbeat'. To see what I mean, search below for Bear with me. Or, just continue reading :)
- This solution is not definitive. If you know of a better way, please let me know. Also, if you know of sources explaining the use of these Special Permissions in a practical way, I'd appreciate you sharing that too.
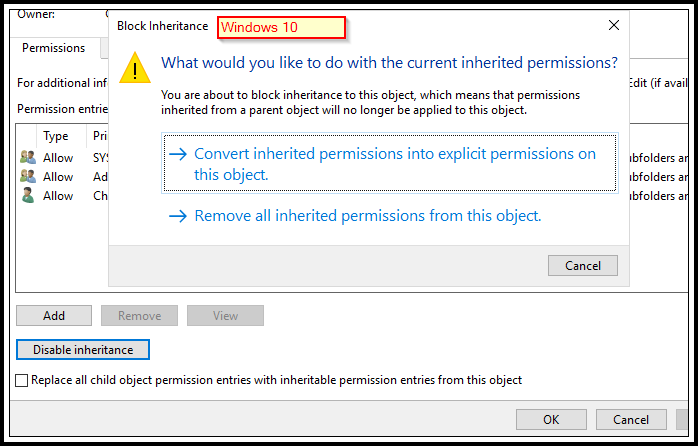
- This example was done in Windows 7. I've included differences in Windows 10 / Server 2016, which are basically dialog cosmetics - functionally, the end result is the same.
Let's get to work!
Create Target Folder and Add User/Group
- Log in as administrator or domain admin
- Create a target folder. This article uses a folder named ExampleFolder
- Right-click folder. Pick Properties. Pick Security tab.
- Pick Edit button and add desired user/group. Give the Modify right. Pick OK to close the dialog.
Clear the Inheritance Setting
- Pick the Advanced button. This opens the Advanced Security Settings dialog.
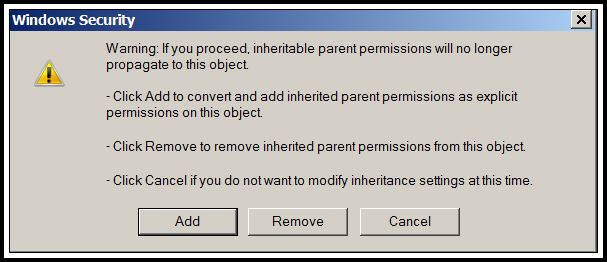
- Pick the Change Permissions button. Uncheck "Include inheritable permissions from this object's parent".
A Windows Security dialog appears. Pick Add button. For Windows 10 / Server 2016, pick Disable Inheritance button. Then, pick "Convert inherited permissions into explicit permissions on this object".
Create the Special Permissions
1. Double-click user/group you added in the prior step. The Permission Entry dialog opens. For Windows 10 / Server 2016, pick "Show advanced permissions" at the right
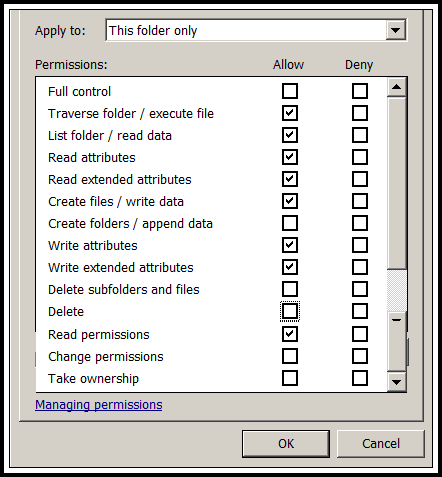
2. Change "Apply to" to "This folder only".
3. Under Allow, pick "Full control" to check everything. Then, uncheck the following: "Full control", "Create folders / append data", "Delete subfolders and files", "Delete", "Change permissions", "Take ownership". Pick OK.
4. Pick the Add button. Enter the same user/group. For Windows 10 / Server 2016, pick "Show advanced permissions" at the right
5. Change "Apply to" to "Files only".
6. Under Allow, pick "Full control" to check everything. Then, uncheck the following: "Full control", "Change permissions", "Take ownership". Pick OK.

7. Pick Add button. Enter the same user/group. For Windows 10 / Server 2016, pick "Show advanced permissions" at the right
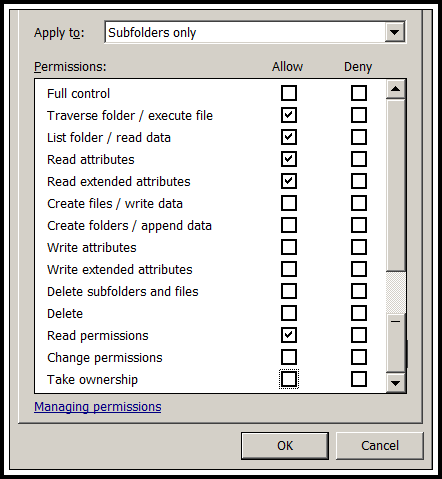
8. Change "Apply to" to "Subfolders only".
9. Under Allow, pick "Full control" to check everything. Then, uncheck the following: "Full control", "Create files / write data", "Create folders / append data", "Write attributes", "Write extended attributes", "Delete subfolders and files", "Delete", "Change permissions", "Take ownership". Pick OK.
10. Pick OK to return to Advanced Security Settings dialog. You have now added 3 Special Permission entries for the user/group similar to this...
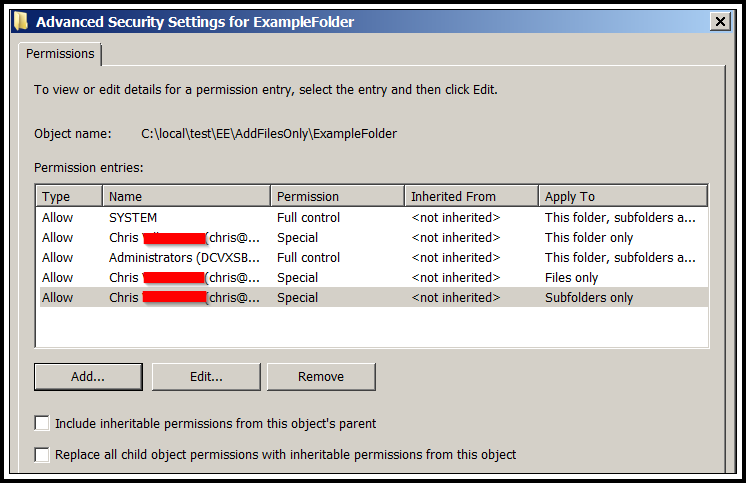
11. Pick OK to close Advanced Security Settings dialog and return to Windows Explorer.
Testing Time!
Bear with me - it's a weird process getting it to work. But, once the files are in the folder, you can rename, edit, or delete them...
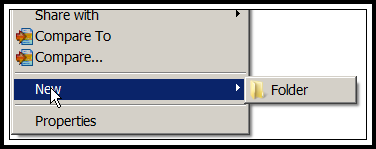
1. Right-click an open area in the folder and pick New. Notice that just the Folder item shows and it's missing the file items that normally show. Pick Folder. You should get Access Denied, which is what you want. Still, everything's backwards! Based on our need, it should not show the Folder item since we can't create folders, and show the various file items since we can create files. Then again, it's probably the way I'm using these permissions and I confused the GUI somehow. *hehe*. Well, at least the need is met and it works.
2. Additionally, if you try to make a folder using the command prompt's MD command, it won't work.
3. To create files, you can't do it via Windows Explorer as you've just seen. You'll need to either:
- Copy and paste the file from another folder - this is probably easiest
- Open a Command Prompt and use the command line tools, i.e. use the COPY command
- Programmatically via command line e.g. .bat, PowerShell, etc.
So, that's a way of allowing the creation of files but not the creation of folders using NTFS Special Permissions, albeit with a weird twist. :)
If you've found this article helpful, please endorse it by picking the Thumbs Up icon below. Thanks and have a great day.

Have a question about something in this article? You can receive help directly from the article author. Sign up for a free trial to get started.
Comments (0)