

Properly securing Remote Desktop Services with an SSL certificate is a subject that causes frequent confusion among IT Professionals. For the purposes of this article, we’ll be discussing Remote Desktop Deployments on Windows Server 2012/2016. While documentation exists on TechNet and other sources describing the SSL requirements, I have yet to find a comprehensive source that covers all the possible scenarios where the requirements differ from one to the next. The four core questions that most folks get stuck on are the following.
- What kind of certificate do I need?
- How do I generate the certificate to deploy it across the environment?
- What server names need to be covered by the certificate?
- What do I do if my internal domain differs from my external domain?
Before we can talk about the questions above, we need to identify each of the core Remote Desktop Roles that will need securing and what their functions are.
- RD Web Access: This is an externally facing service that provides the web interface the users will access to login and launch their RemoteApps
- RD Gateway: This is an externally facing service that receives the RDS connections from the internet, checks the connections against a defined set of connection and resource policies, and passes them on to the Connection Broker
- RD Connection Broker: This is an internal service that handles all the session management for incoming RDS connections. In an environment with multiple session hosts, for example, the connection broker is responsible for load balancing the connections evenly across the farm.
- RD Session Host: These are the workhorses of the environment, and are the servers that the users are logging into, and where the published RemoteApps execute from.
Now that we have defined the services that need to be covered by our SSL certificate, let’s talk about the certificate itself. Since we know that we need to potentially secure multiple server names, we need to purchase either a SAN or Wildcard Certificate. In most cases I would always recommend a Wildcard certificate since it will cover an unlimited number of hosts under a single domain. SAN certificates are certainly a little cheaper, however they have a maximum of 3 hosts, so if your RDS environment expands in the future, you’re going to need to issue a wildcard down the line anyway.
Regardless of which certificate type you choose, it will need to cover all the servers in the environment:
- The RD Web Access URL you have chosen
- The RD Gateway URL you have chosen
- The internal server name of the Connection Broker
- The internal server names of your session hosts
Initially creating the certificate can be done from any copy of IIS, just like you would any other web server certificate. When the RD Web Access role is deployed, it will add IIS to the server and you can use the Internet Information Server MMC to accomplish this. Ensure that you are generating a certificate with a known authority (Network Solutions, RapidSSL, GoDaddy, etc.) so that your certificate will be trusted.
Once the certificate is installed, it needs to be exported to PFX format so it can be deployed to the other servers in the environment.
- Open MMC
- Add the Certificates Snap-In for the Local Computer Context (You should find your certificate under Personal\Certificates)
- Right-Click on the certificate, All Tasks > Export
- Ensure that you choose YES when asked to export the private key
- Choose Personal Information Exchange and include all certificates in the certification chain
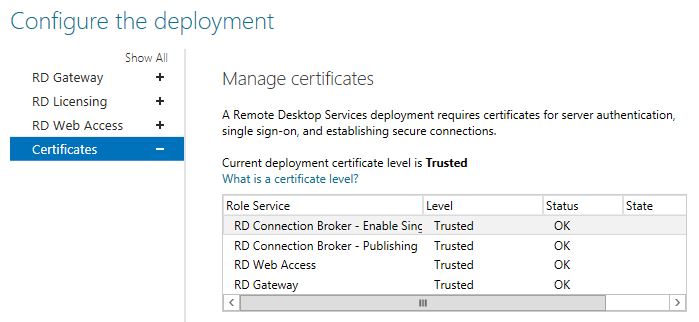
Once you have the PFX file, deploying the certificate to the environment can be accomplished under the Edit Deployment\Certificates section of the Remote Desktop Services management panel in Server Manager. Simply choose each role service and supply your Exported PFX.
Now that we understand how and where the certificate is generated and deployed, we’ll talk about the two distinct DNS scenarios that will have an impact on your deployment.
Split DNS Scenario
This is the easier of the two possible deployment situations. Consider the following:
- Externally, domain.com is handled by an external DNS provider
- Internally, domain.com is handled by your internal AD DNS domain
In this case, all internal server names (specifically the connection broker and session hosts) will resolve to server.domain.com and match your wildcard or SAN certificate. No additional action should be required for everything to run smoothly
.local Internal Domain Names
This scenario is where things get a little tricky. Consider the following:
- Externally, domain.com is handled by an external DNS provider
- Internally, the local AD DNS domain is domain.local
The Web Access and Gateway roles will not need modification as those only require external DNS entries, but this will present a problem for your internal services. When a user opens a RemoteApp, it will first hit the gateway, but then get internally forwarded to the Connection Broker using the internal hostname. Because these internal hostnames are using .local addresses, your certificate will not match and the connection will fail.
Fortunately, while taking a little bit of effort, this is fairly easily solved.
The first thing we need to do is modify the connection URL of the Connection Broker. While there is no way to do this through the GUI, I have used the following PowerShell Script numerous times for just this purpose.
https://gallery.technet.microsoft.com/Change-published-FQDN-for-2a029b80
If your internal connection broker hostname is cb.domain.local, you can issue the following command using the above script to change it to match your certificate.
Set-RDPublishedName "cb.domain.com"Once that’s done, the next problem is that cb.domain.com will now need to internally resolve to the local IP address of the Connection Broker (Just like cb.domain.local does). To accomplish this, you need to make your internal AD DNS server authoritative for that particular host.
- Open Active Directory DNS on one of your Domain Controllers
- Create a new Primary Zone for the fully qualified name of the connection broker (cb.domain.com)
- Create a single A record, leave the name field blank, and enter the local IP address of the Connection Broker
The end result is that, internally, any DNS lookup for cb.domain.com will resolve to the local address of your Connection Broker, while all other DNS requests for domain.com will still be answered by your external DNS provider. This will allow your external domain certificate to match the defined connection hostnames in your deployment.
One other item of note is that you will need to add your modified connection broker server name to your Resource Authorization Policy on your RD Gateway. If this isn't done, the gateway will not allow the connection to your RD Connection Broker when logging in.
Have a question about something in this article? You can receive help directly from the article author. Sign up for a free trial to get started.
Comments (0)