HOW TO: Install and Configure VMware vSphere Hypervisor 7.0 (ESXi 7.0 ARM) on a Raspberry Pi 4

 VMware and Virtualization Consultant
In my previous Experts Exchange Articles, most have featured Basic and Intermediate VMware and Virtualisation Topics.
If you would like to read my Basic VMware articles, they are listed at the end of this article for your convenience.
This article will show you how to install and configure the VMware vSphere Hypervisor 7.0 for ARM on a Raspberry Pi 4. VMware vSphere Hypervisor 7.0 is also known as ESXi 7.0, and this is also referred to as ESXi ARM edition.
A full list of the ESXi 7.0 Arm Edition Hardware Requirements can be found here - https://flings.vmware.com/esxi-arm-edition#requirements
Check the hardware requirements to discover if your ARM device is "certified" for use with ESXi 7.0 ARM edition.
If your device is not listed above, it may still be possible to install and run VMware ESXi 7.0 on your ARM device.
1. Register with VMware.com and Download VMware vSphere Hypervisor 7.0 for ARM.
Open the following link in your web browser ESXi ARM edition

Tick and agree to the Technical Preview License. Click Download.
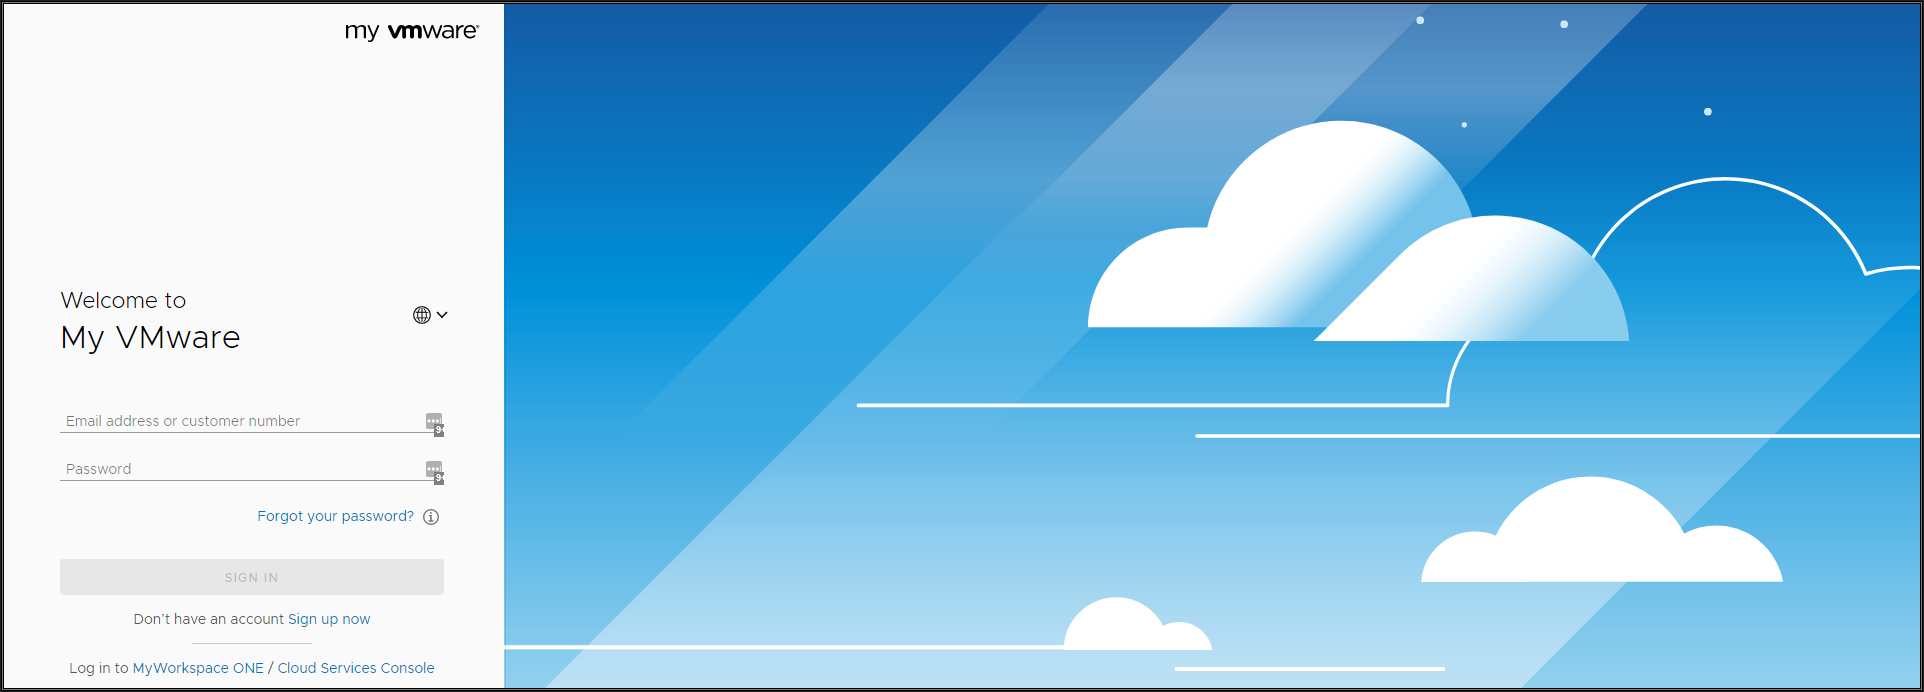
Click Create an Account, to Create an Account and Login to the VMware Download Center.
The following page will be displayed when you have successfully logged into the VMware Download Center.
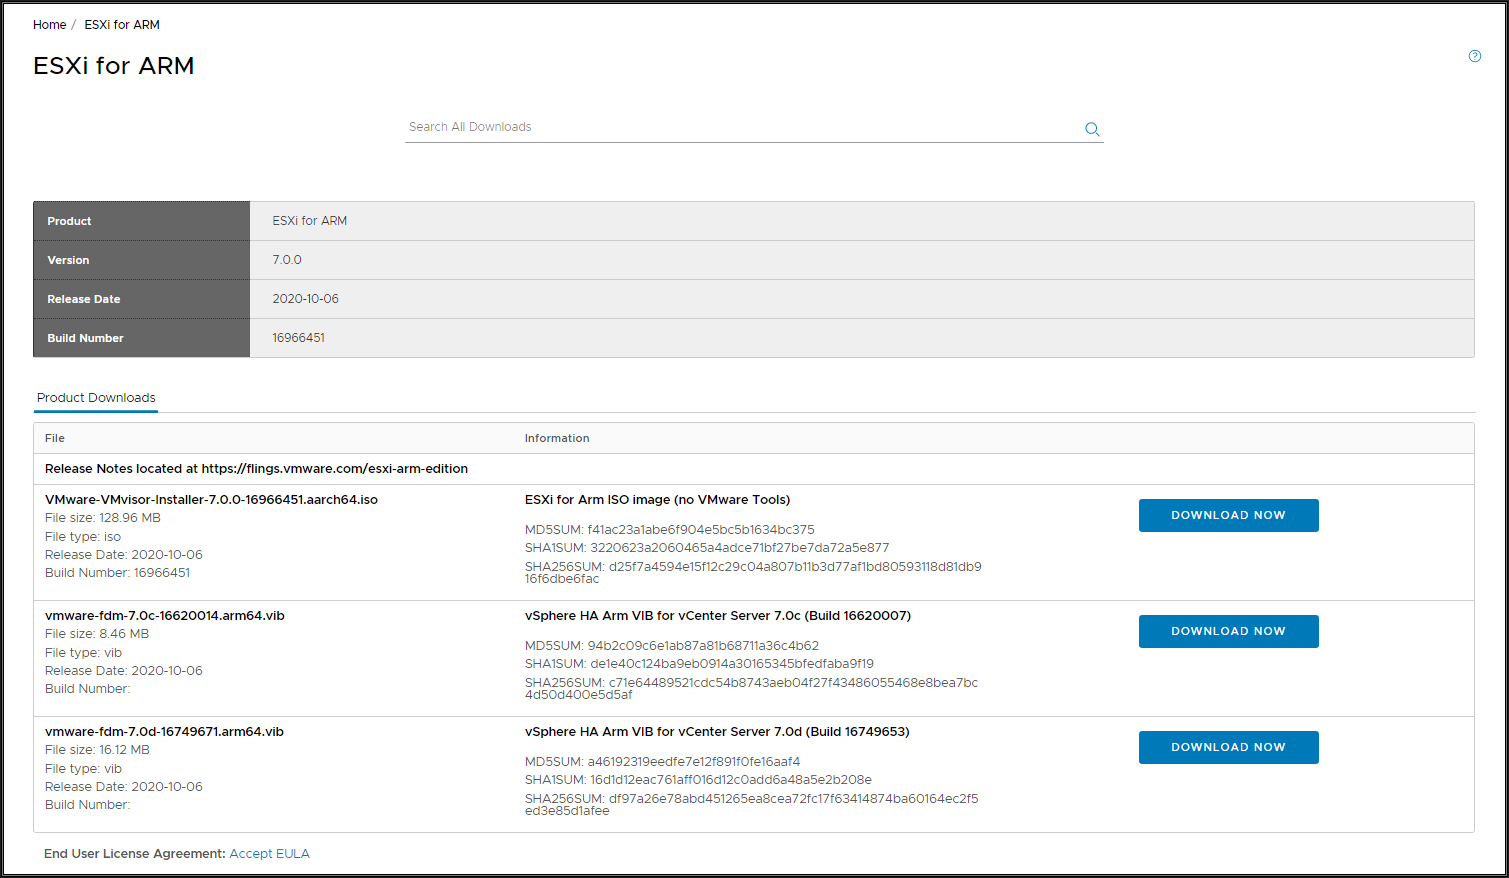
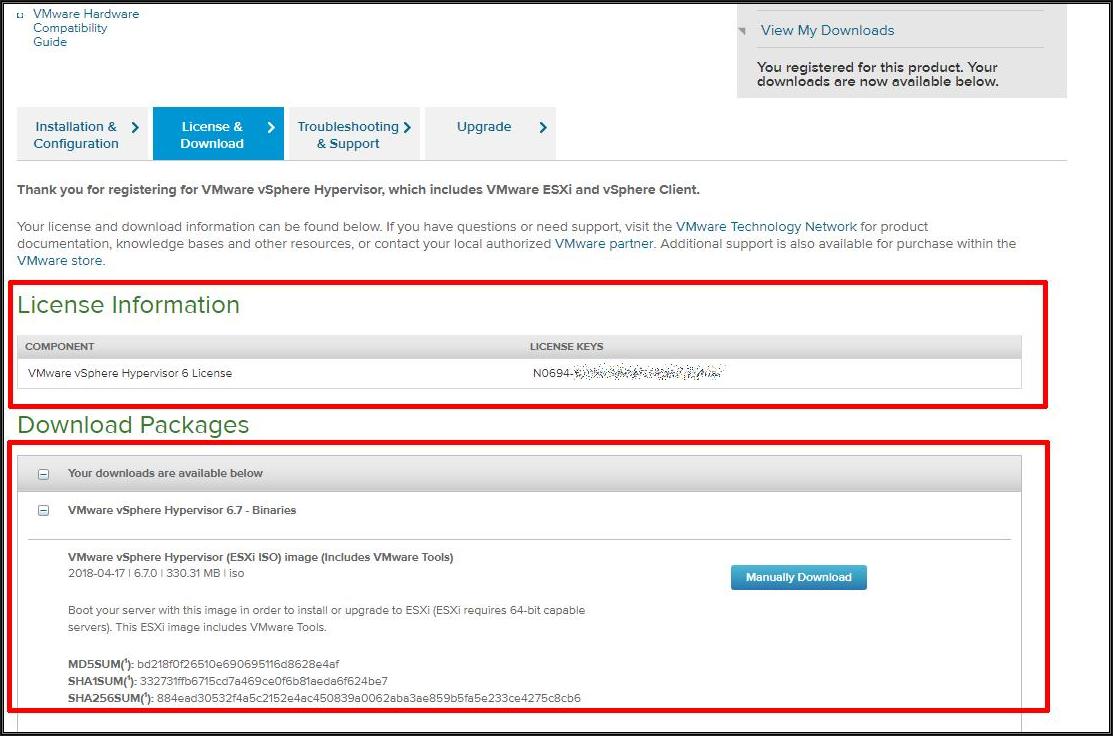
Click the download link for ESXi for Arm ISO image (no VMware Tools) to download the software required to install ESXi 7.0 ARM edition. The filename you want to download is called VMware-VMvisor-Installer-7.0.0-16966451.aarch64.iso. The clue is in the word VMvisor installer; many questions get posted to Experts Exchange because the wrong file has been downloaded and burnt to a CDROM.
The eight-digit number 16966451 indicates the Build number of ESXi, and this number will increase if your patch your host ESXi server. Build 16966451 is the Technical Preview release of ESXi 7.0 ARM edition. Patching will be covered later in a new article.
Either use the Download Manager or Manually Download button (which uses your web browser). The CD ISO is only 130MB so should not take too long to download. We now have a very fast internet connection, but on our slow internet connection at approx 350 kB/sec, and it takes us approximately 10 minutes to download.
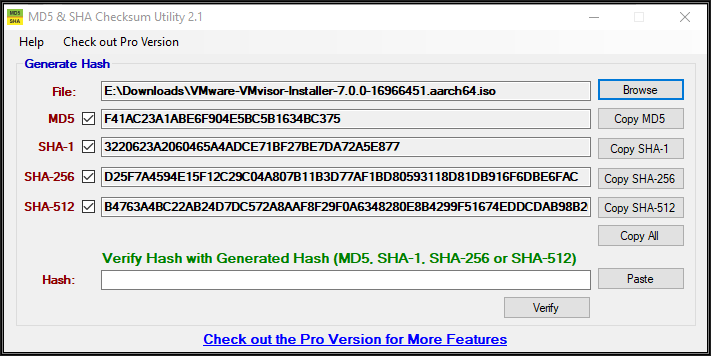
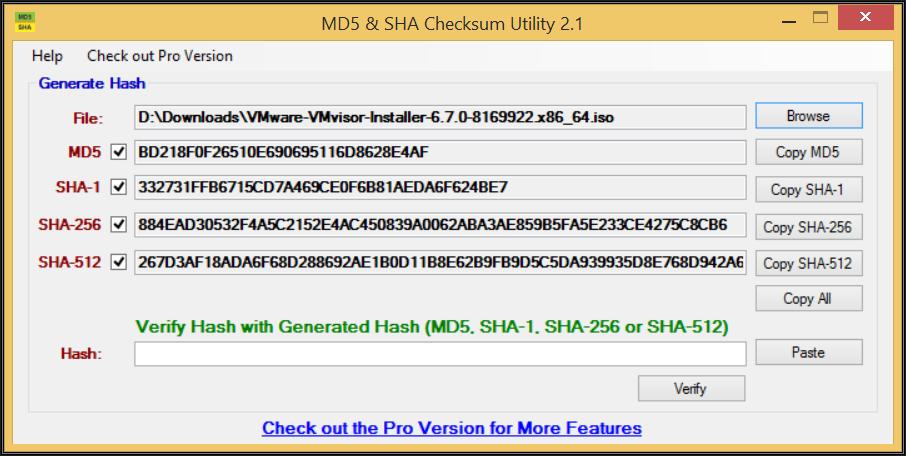
Once the downloads have been completed using your favourite MD5 and SHA1 checksum utility, confirm the downloads have been downloaded correctly, using the published MD5 and SHA1 checksums from the VMware website. We use the MD5 & SHA-1 Checksum Utility 2.1 from Raymond's WordPress.
Many VMware vSphere Hypervisor 7.0 installations fail due to corrupt downloads.
MD5 Checksum: F41AC23A1ABE6F904E5BC5B1634BC375
SHA-1 Checksum: 3220623A2060465A4ADCE71BF27BE7DA72A5E877
SHA-256 Checksum: D25F7A4594E15F12C29C04A807B11B3D77AF1BD80593118D81DB916F6DBE6FAC
SHA-512 Checksum: B4763A4BC22AB24D7DC572A8AAF8F29F0A6348280E8B4299F51674EDDCDAB98B26A08828E21D87DAA42B72F88FA11BD14C0ECFC3E5FEF0CFFA7A55AA1B69A074
2. Raspberry Pi4 setup and configuration
The Raspberry Pi4 requires some additional configuration before the ESXi for Arm ISO image can be booted. The EEPROM needs to be updated and UEFI firmware needs to be configured.
Updating the Raspberry Pi4 EEPROM.
Boot the Pi OS, and type the following
sudo rpi-eeprom-update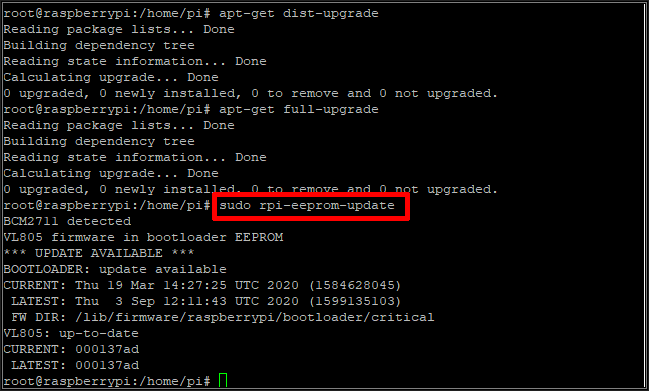
Type the following to update the EEPROM
sudo rpi-eeprom-update -aand restart the Pi. Confirm the EEPROM has been updated.
sudo rpi-eeprom-update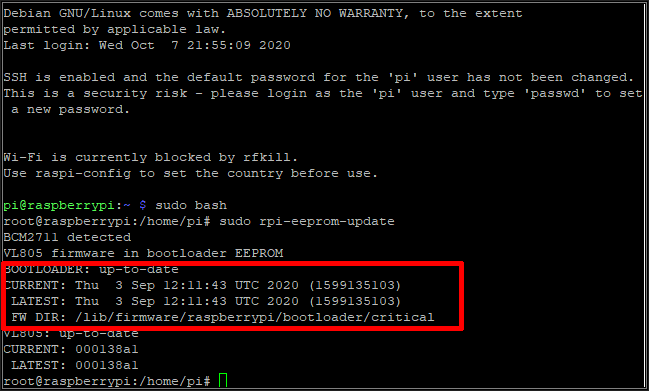
Create the UEFI BOOT MicroSD for Raspberry Pi.
The Raspberry Pi does not include a BIOS which includes UEFI boot code. So we will have to create a UEFI boot loader, on the MicroSD card. This will be the only purpose for the MicroSD card, so there is little advantage to purchasing a very large MicroSD card for this purpose because the UEFI boot loader will need no more than 256MB.
Pre-requisites
1. Raspberry Pi Firmware.
Extract and unzip the file, delete all the kernel files (kernel*.* in the \boot folder).
2. Raspberry Pi 4 UEFI Firmware.
Extract the files from this archive zip file and overwrite the files in the \boot folder above
3. Format the MicroSD card as FAT32.
4.Copy the entire contents of the \boot folder to the \root of the MicroSD card.
5. Insert the MicroSD card and Power On the Raspberry Pi 4.
If you have copied the files correctly the Pi will boot displaying a Raspberry Pi logo, press escape to enter the "UEFI BIOS".

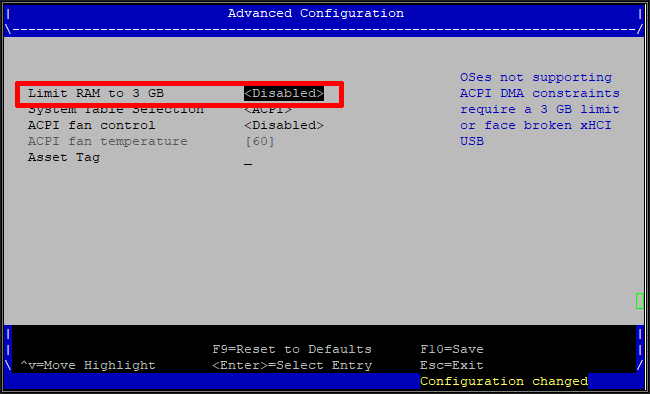
6. 3GB UEFI memory limit.
This needs to be disabled on the Pi because it stops the ESXi for ARM installer executing.
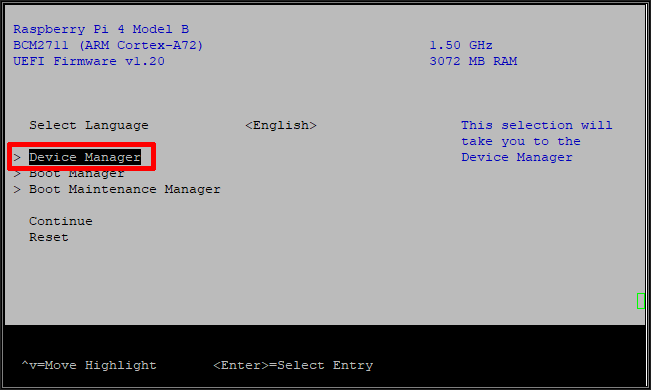
Select Device Manager.
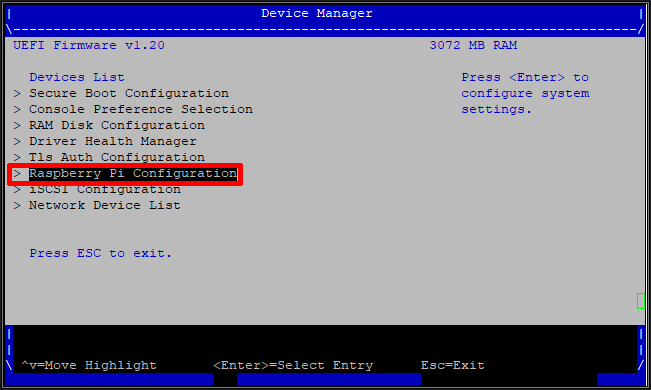
Select Raspberry Pi Configuration.
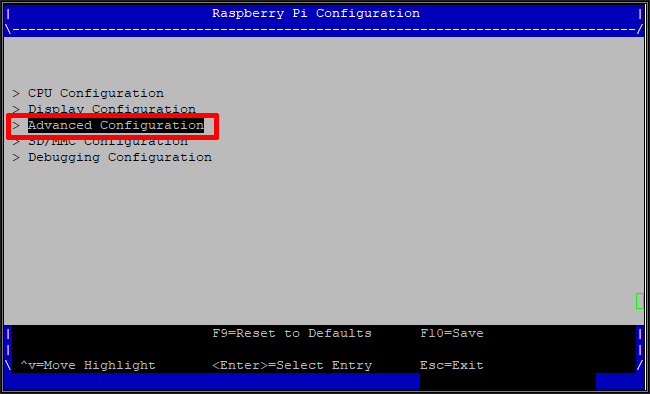
Select Advanced Configuration.
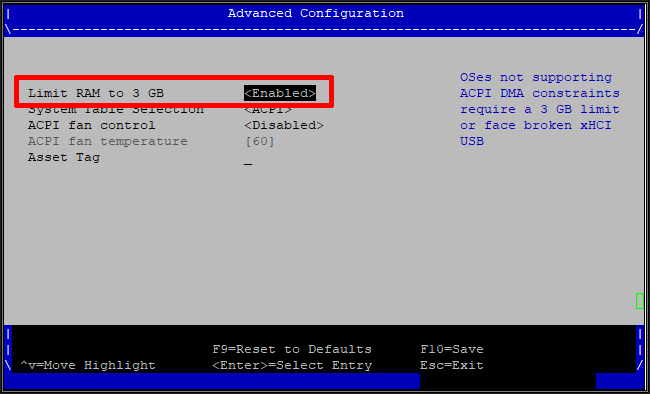
Toggle to Disabled. and Press F10 to Save and Restart.
3. Installing VMware vSphere Hypervisor 7.0 (ESXi 7.0) for ARM.
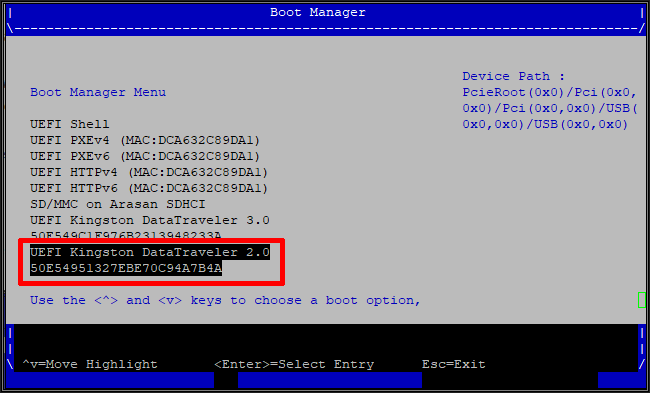
Write (Burn) the VMware-VMvisor-Installer-7.0.0-16966451.aarch64.iso downloaded in Step 1, to a blank USB flash drive, using your favourite USB writing software. You can use Rufus to "burn" to a USB flash drive.
You will need to select the correct USB BOOT order in the Raspberry Pi "UEFI BIOS" to BOOT the installer. I'm using a Kingston DataTraveller 2.0 as an installer ISO. You will need to install ESXi to either USB or an iSCSI LUN. You will notice I have also inserted a Kingston DataTraveller 3.0 (USB3) for the ESXi installation. I will not be storing virtual machines on this 32GB USB flash drive, I will be using NFS network storage.
Power on the Pi, the Pi will BOOT from the USB flash drive. The installation is then the exactly the same procedure as installing VMware vSphere Hypervisor 7.0 (ESXi 7.0) which is covered here in this Experts Exchange Article Part 1: HOW TO: Install and Configure VMware vSphere Hypervisor 7.0 (ESXi 7.0)

Congratulations you have successfully installed and configured VMware vSphere Hypervisor 7.0 for ARM. (ESXi on ARM).
These articles are also applicable to VMware vSphere Hypervisor ESXi 5.0, 5.5, 6.0.
These articles are applicable to VMware vSphere Hypervisor 6.5.
These articles are applicable to VMware vSphere Hypervisor 6.7.
Previous articles in this VMware vSphere 7.0 series are here.
- Part 7: HOW TO: Create your first Windows Virtual Machine on a VMware vSphere Hypervisor 7.0 (ESXi 7.0) Host Server
If you found this tutorial helpful, please do click the Thumbs-Up icon below. This lets me know what is valuable for EE members and provides direction for future articles. If you have a related question based on this article, please click here.
Thank you very much!
Regards, Andy
Have a question about something in this article? You can receive help directly from the article author. Sign up for a free trial to get started.
Comments (0)