An unusual Windows 10 Blue Screen of Death


IT Professional - Helping others to help themselves. https://andrewleniart.com & https://www.computerhelpzone.com.au/testimonial/
Published:
Browse All Articles > An unusual Windows 10 Blue Screen of Death
For no apparent reason, my copy of Windows 10 suddenly blue screened with an unusual screen of death that took a while to finally nut out a fix. This article gives step by step instructions with screengrabs on how to fix the problem. Hope it's helpful to you.
My copy of Microsoft Windows 10 Pro - Version 10.0.18369 (Build 18363) decided to die this morning, and all I did was a normal restart when it happened.
Nothing was changed or installed, yet I ended up with the dreaded Windows Blue Screen of Death. Not the usual type we generally see with error codes - instead, it looked like the following:
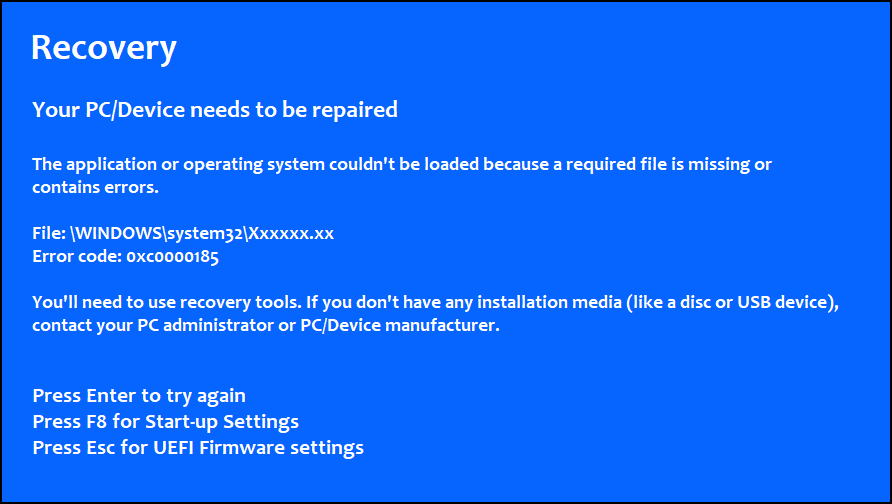
Pressing Enter to try again did nothing, nor did pressing F8 or Esc. I powered off and back on again, only to be faced with the same problem. I then went into BIOS and reset everything back to defaults and still no joy.
Googling the problem found lots of articles, but none that were helpful or worked for me.
I managed to figure out how to fix it though, so here are the steps I went through to regain access to my computer's (Windows 10 Professional) operating system.
Here's what you need to do.


You can now close everything on the screen except for the CLI Administrator Command Prompt. We are now going to try and repair Windows 10 so that it will boot again.
In the Command Prompt, type the following commands, followed by pressing your Enter key.
x:\Sources>D: and press your Enter key, as shown below:

(Remember to change the letter "D" to whichever drive letter your Windows drive is, as explained in Step 6 above.
Now type chkdsk (without any switches) and press your enter key. The command, as shown below, runs chkdsk in read-only mode.
If you get the following message at the end of the scan, then move onto Step 12.

If on the other hand, you got errors reported, then rerun the chkdsk command again, only this time with the /F switch. I.e., chkdsk /F and press your Enter key again. Chkdsk will run again and attempt to repair any File, System Structure, and Security Descriptor corruptions.
NOTE: If you see a message that says "Total Windows Installations: 1" then press the Y key on your keyboard to add the installation to the boot list, then continue.


IMPORTANT: Remember to replace the "D:\Windows" part of the above command with the 'osdevice' drive letter you made a note of in Step 14 above, or the command will fail!
CONCLUSION
After performing all of the above steps, and then restarting my computer again, it booted up normally as always, and I did several restarts to make sure the problem was indeed fixed. I also powered the computer off entirely a couple of times and confirmed all is now well.
As a result, I think I can confidently say that unless you have a hardware problem, then following all of the steps in this article should hopefully work for you too.
Hope it helps you out.
Note: If you need any "Support" about this topic, please consider using the Ask a Question feature of Experts Exchange. I and other experts monitor the questions asked and would be pleased to provide any additional support required.
Finally, if you think this article was helpful and useful for EE members, please do click the "Thumbs Up" button below.
It helps me out and also provides me with positive feedback. Thank you. Regards, Andrew

Nothing was changed or installed, yet I ended up with the dreaded Windows Blue Screen of Death. Not the usual type we generally see with error codes - instead, it looked like the following:
Pressing Enter to try again did nothing, nor did pressing F8 or Esc. I powered off and back on again, only to be faced with the same problem. I then went into BIOS and reset everything back to defaults and still no joy.
Googling the problem found lots of articles, but none that were helpful or worked for me.
I managed to figure out how to fix it though, so here are the steps I went through to regain access to my computer's (Windows 10 Professional) operating system.
Here's what you need to do.
Step 1.
Create a Windows 10 bootable USB stick using Microsoft's Windows 10 installation media tool.
Step 2.
Now boot with the USB Flash Drive you've created and when you get to the following screen, press your Shift + F10 key.
Step 3.
An Administrator CLI command prompt opens. Type Notepad as shown below, and press your Enter key.
Step 4. Notepad opens, which allows you to do several things.
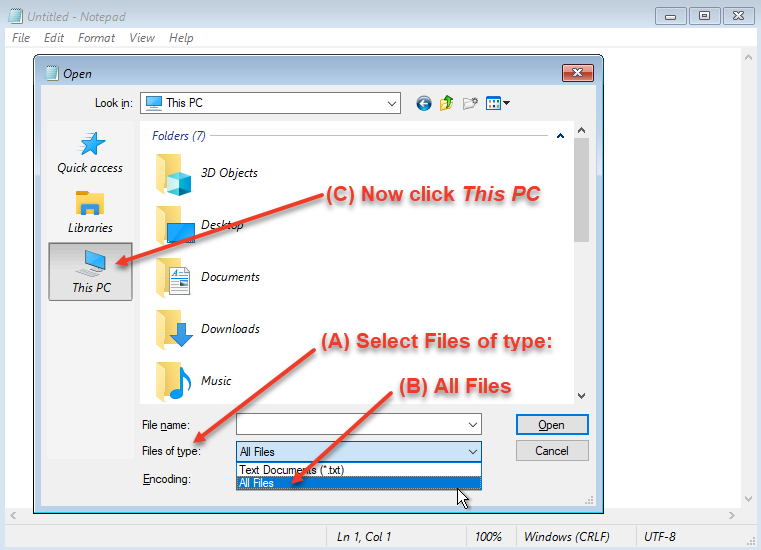
Step 5. Now in Notepad, Click File > Open and then (A) select Files of type: and then (B) to All Files and finally, (C) click This PC as shown below.
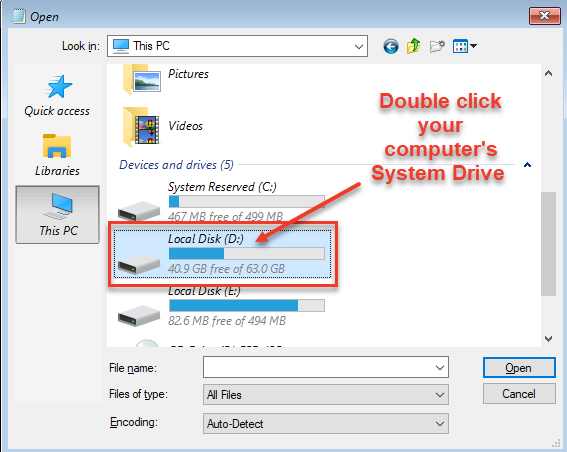
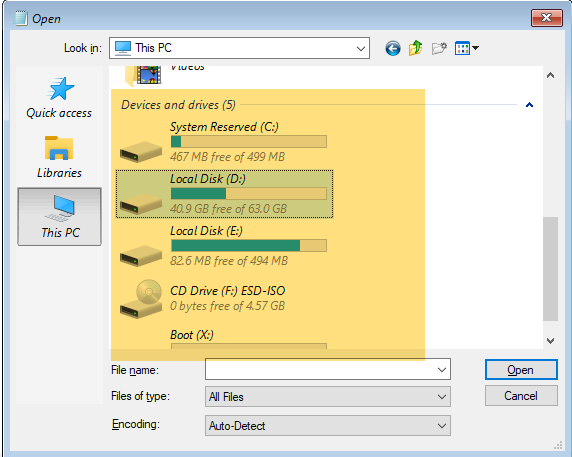
Step 6. Now, if you need to Back Up some files (just in case), locate which drive letter is the Windows 10 drive or partition. In the example below, it happens to be "Local Disk (D:)"
Important: Your drive letter may differ to mine. Once you've located and know what it is, remember it or write it down - you'll need it later.
Double left-click on your Windows 10 drive letter.
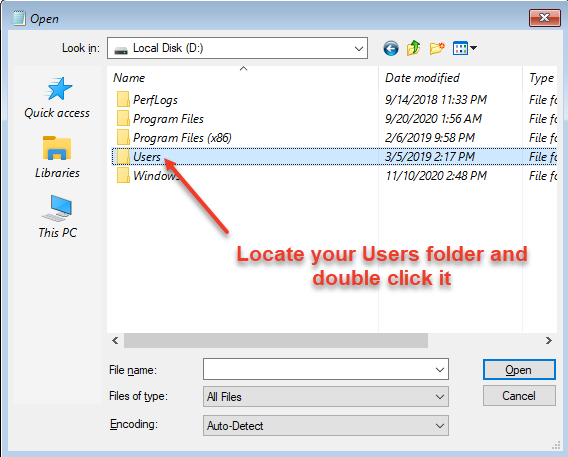
Step 7. Now locate your Users folder and double click it.
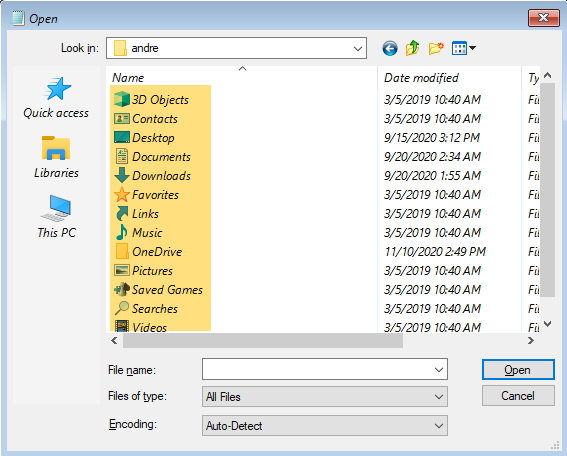
Step 8. Now select your Windows profile user folder and double click it. In the example below, it's called 'andre'
Step 9. You can now see all of the folders under the Users folder such as Desktop, Documents, Downloads, Music, Pictures, and so on.
Step 10. Let's assume you wanted to back up your Documents folder. In that case, left-click on it once, then (1) right-click it and select (2) Copy as shown below. Then click on (3) This PC again.
Step 11. Now select either another hard drive in your computer to copy your backup of the Documents folder to, or alternatively, plug in a USB Flash or External Drive and copy the folder to there as a backup. Note that this shouldn't be necessary, but better safe than sorry, right?
You can now close everything on the screen except for the CLI Administrator Command Prompt. We are now going to try and repair Windows 10 so that it will boot again.
In the Command Prompt, type the following commands, followed by pressing your Enter key.
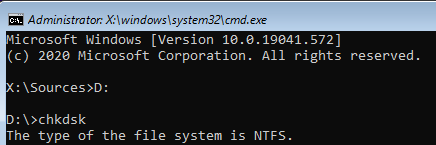
x:\Sources>D: and press your Enter key, as shown below:
(Remember to change the letter "D" to whichever drive letter your Windows drive is, as explained in Step 6 above.
Now type chkdsk (without any switches) and press your enter key. The command, as shown below, runs chkdsk in read-only mode.
If you get the following message at the end of the scan, then move onto Step 12.
If on the other hand, you got errors reported, then rerun the chkdsk command again, only this time with the /F switch. I.e., chkdsk /F and press your Enter key again. Chkdsk will run again and attempt to repair any File, System Structure, and Security Descriptor corruptions.
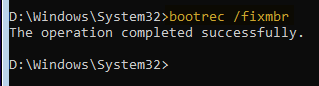
Step 12. Now run the command bootrec /fixmbr and press your Enter key as shown below:
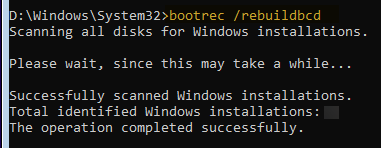
Step 13. Next, run the command bootrec /rebuildbcd and press your Enter key as shown below
NOTE: If you see a message that says "Total Windows Installations: 1" then press the Y key on your keyboard to add the installation to the boot list, then continue.
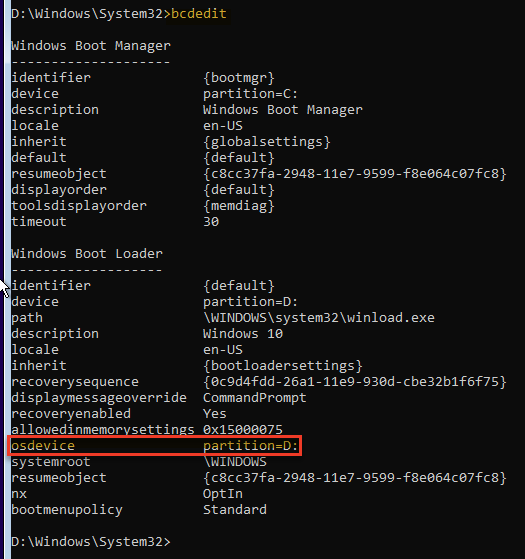
Step 14: Next, type the command bcdedit and press your enter key. Take note of the following value.
osdevice partition=D
(Note that your partition device may be some other letter, so take a note of which letter it is. In this example, it is D: (See below)
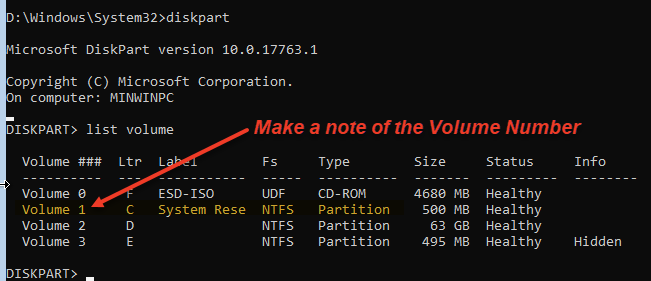
Step 15: Next, type the command diskpart and press your enter key, followed by the command list volume and again press your Enter key.
Now make a note of the System or System Reserve partition Volume Number. In the example below, it is Volume 1, Letter C and the Label is System Reserve then move onto Step 16.
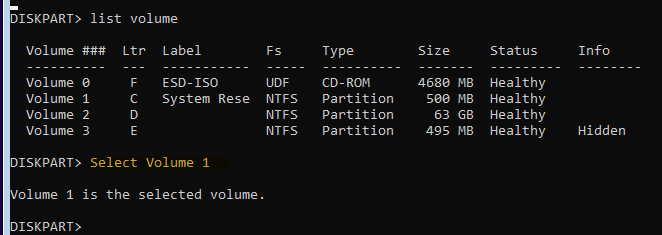
Step 16. Now type Select Volume 1 (in the example below) and press your Enter key.
Step 17. Now type assign letter=Z and press your Enter key as shown below
Step 18. Now type EXIT and press your Enter key as shown
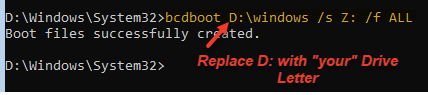
Step 19. Now type bcdboot D:\Windows /s Z: /f ALL and press your Enter key as shown
IMPORTANT: Remember to replace the "D:\Windows" part of the above command with the 'osdevice' drive letter you made a note of in Step 14 above, or the command will fail!
CONCLUSION
After performing all of the above steps, and then restarting my computer again, it booted up normally as always, and I did several restarts to make sure the problem was indeed fixed. I also powered the computer off entirely a couple of times and confirmed all is now well.
As a result, I think I can confidently say that unless you have a hardware problem, then following all of the steps in this article should hopefully work for you too.
Hope it helps you out.
Note: If you need any "Support" about this topic, please consider using the Ask a Question feature of Experts Exchange. I and other experts monitor the questions asked and would be pleased to provide any additional support required.
Finally, if you think this article was helpful and useful for EE members, please do click the "Thumbs Up" button below.
It helps me out and also provides me with positive feedback. Thank you. Regards, Andrew
IT Professional - Helping others to help themselves. https://andrewleniart.com & https://www.computerhelpzone.com.au/testimonial/
Have a question about something in this article? You can receive help directly from the article author. Sign up for a free trial to get started.
Comments (2)
Commented:
I had benefited a lot from your useful comments during writing my articles , so here I add some points, just in case you have got a chance to add some information regarding them to the article, that would be very great:
1) Is this specific to EFI/GPT or it might be faced in BIOS/MBR como? and you used which? (I assumed 1st according to BSOD screenshot, but see below)
2) In step 12, fixing the MBR would respond differently when it is GPT (so I assume 2nd).
3) Both assumptions above could be true if you used a more complex boot configuration. Or you just booted into PE using BIOS/Legacy mode. If possible, please add some more information.
4) Finally please justify using /f All instead of /f BIOS or /f UEFI in step 19
Thanks again for your great article
Commented:
Thank you for this article. I hope I never have to refer to it. The BSOD is not exactly what I wish to ever deal with but it is good to be knowledgeable about it. Thank you once again.
Basem Khawaja